
Introduction:
Token-based authentication is a popular method used to secure web APIs. It involves the client sending a request with valid credentials to the server, which then verifies the details and responds with an access token. This token contains user-specific information and serves as an identifier. The client can include this token in the header of subsequent requests to access restricted resources until the token expires. In this article, we will explore the advantages of token-based authentication in web APIs and provide a detailed step-by-step procedure to implement it in an ASP.NET Web API application.
Advantages of using Token-Based Authentication in Web API
- Scalability of Servers
- Loosely Coupling
- Mobile-Friendly
Let’s discuss the step-by-step procedure to create Token-Based Authentication in ASP.NET Web API,
Step 1: Create a new Web API application
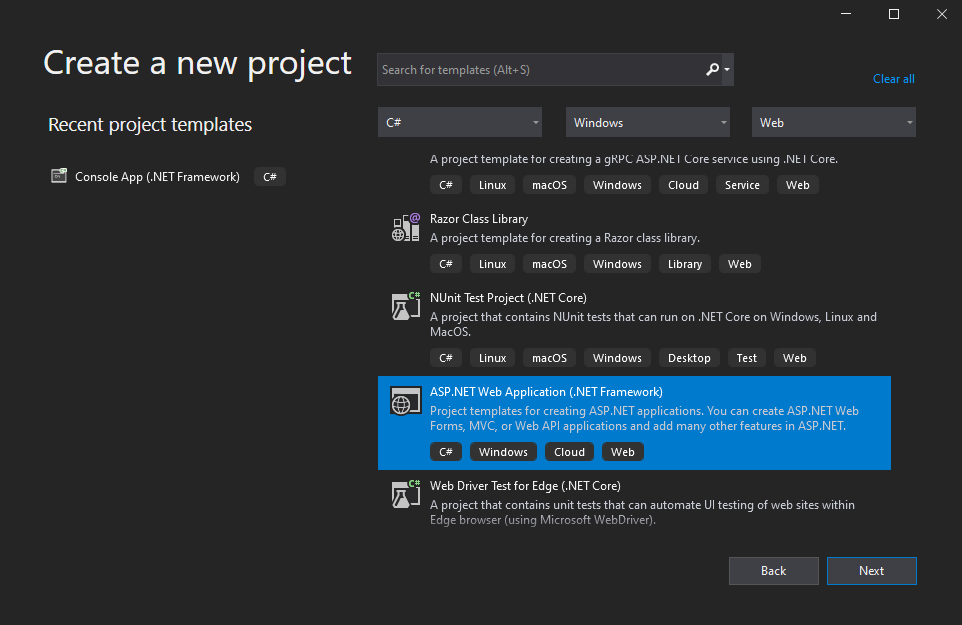
Open Visual Studio 2019 and Select "Create a New Project". Next dialog, Select "ASP.NET Web Application (.Net Framework)" and click Next.,
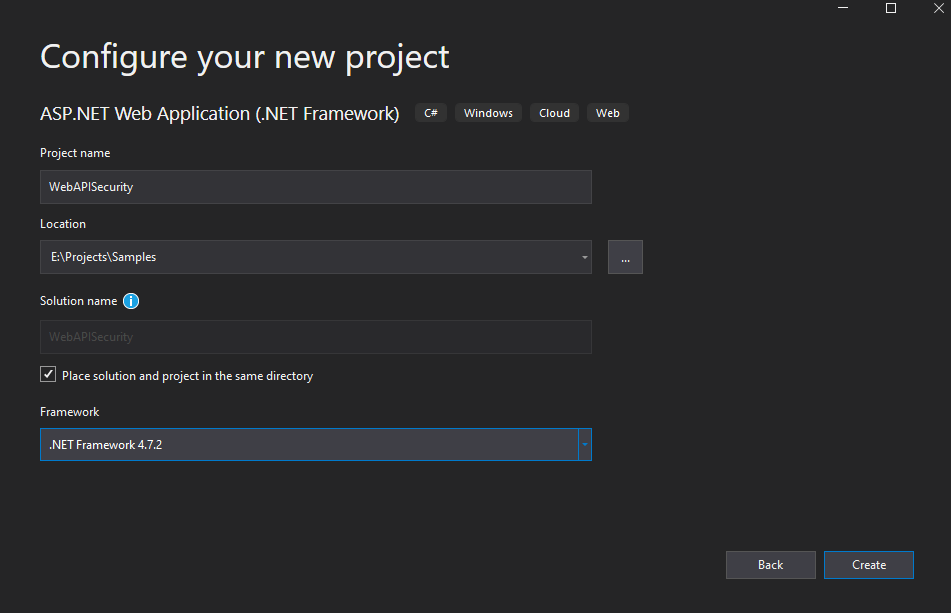
Next, provide Project Name, Location, and Solution Name in the below dialog as shown below,
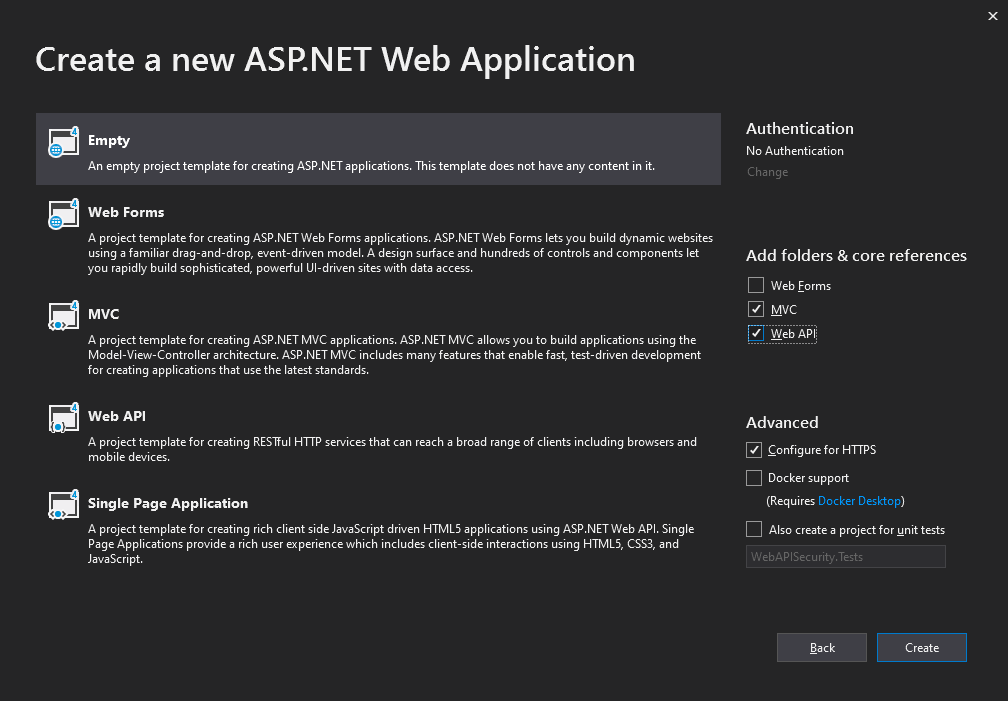
In the "Create a new ASP.NET Web Application" dialog, select the Empty template and choose MVC and WebAPI check box and click Create.
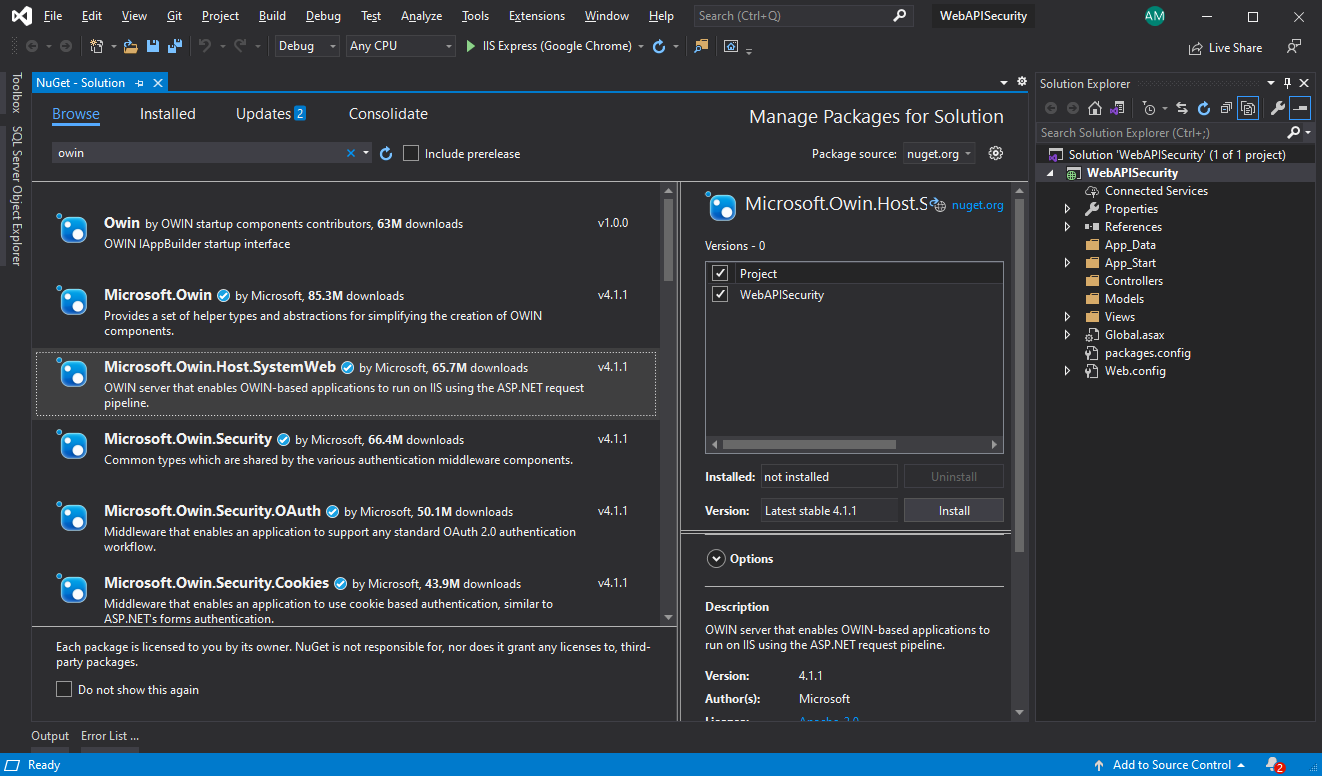
Step 2: Installing and adding required packages
We need to add the below packages in order to implement the token-based authentication in ASP.NET Web API.
- Microsoft.Owin.Host.SystemWeb
- Microsoft.Owin.Security.OAuth
- Microsoft.Owin.Cors
- Entity Framework
To install the packages, select Tools > NuGet Package Manager > Manage Nuget Packages for Solution.
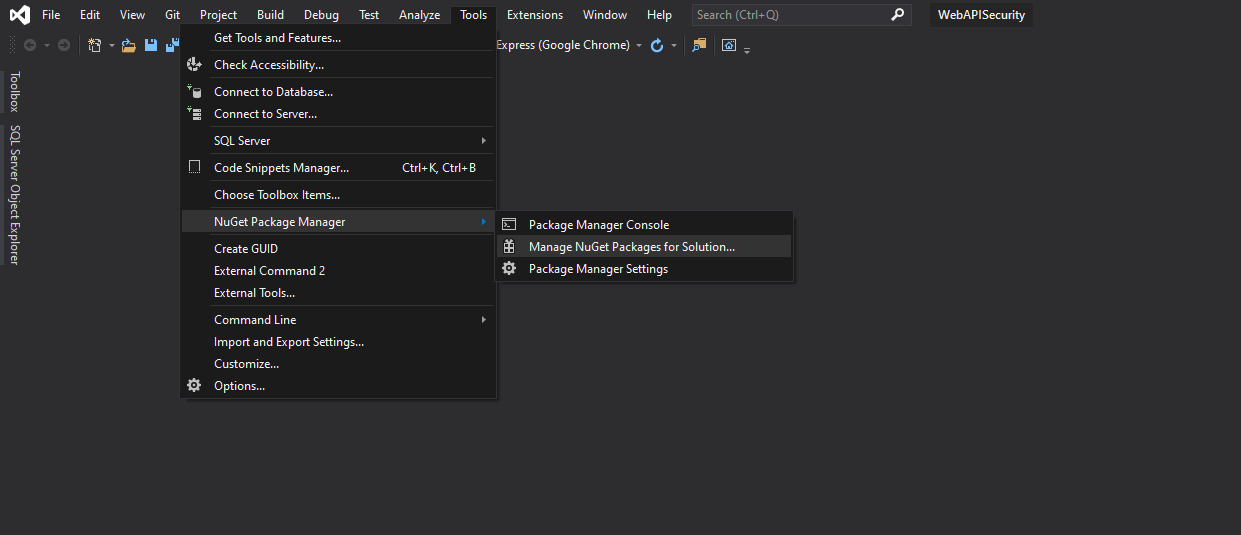
In the below NuGet screen, search the required packages (listed above) and select Project, and click Install.
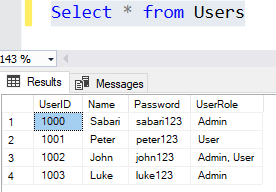
Step 3: Create a database and tables
We will create the below database and table and insert a few records for our demo.
CREATE DATABASE TechieCluesDb
GO
USE [TechieCluesDb]
CREATE TABLE Users
(
  UserID INT PRIMARY KEY,
  Name VARCHAR(60),
  Password VARCHAR(20),
  UserRole VARCHAR(50)
)
GO
INSERT INTO Users VALUES(1000, 'Sabari', 'sabari123', 'Admin')
INSERT INTO Users VALUES(1001, 'Peter', 'peter123', 'User')
INSERT INTO Users VALUES(1002, 'John', 'john123', 'Admin, User')
INSERT INTO Users VALUES(1003, 'Luke', 'luke123', 'Admin')
GO
The table looks like below,
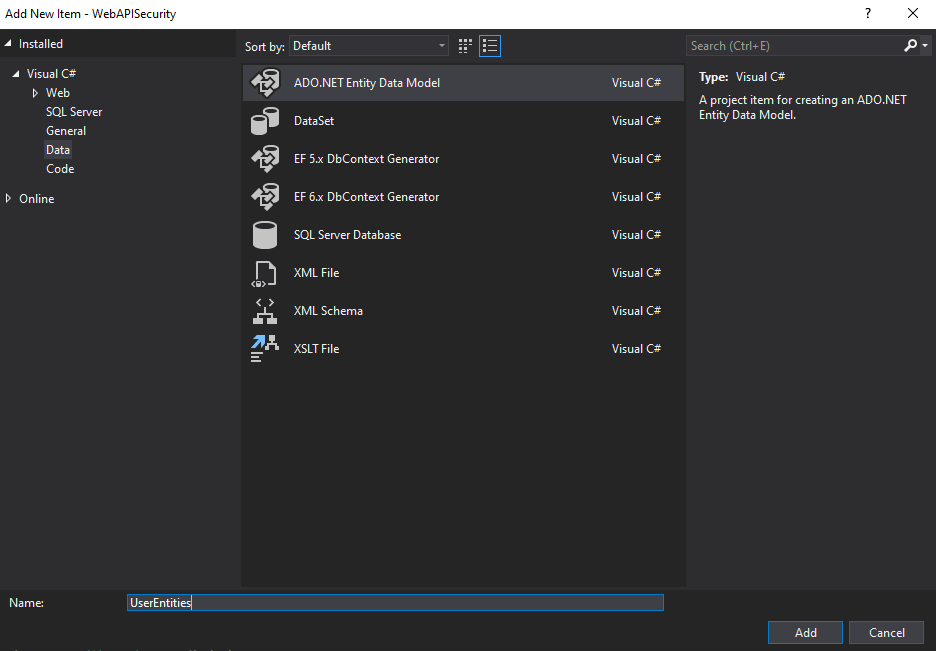
Step 4: Create the ADO.NET Entity Data Model
Right-click on the Model folder and select Add > New Item and in the window select "ADO.NET Entity Data Model" and provide the Name "UserEntities".
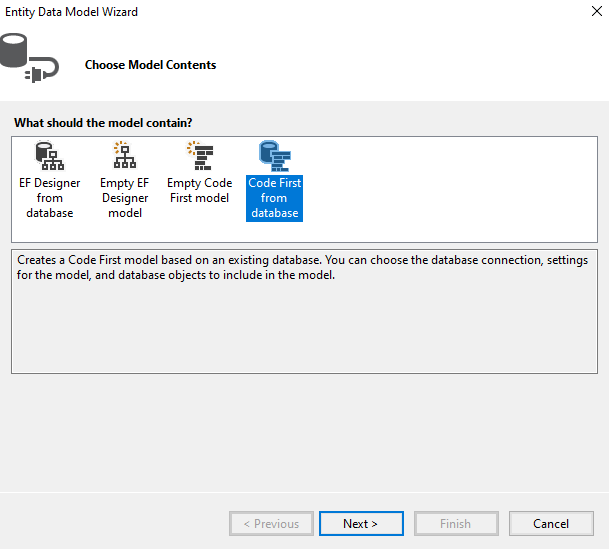
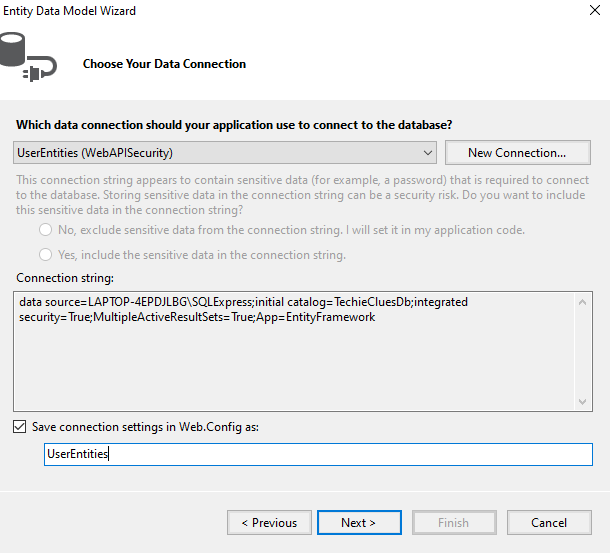
Below the dialog, choose "Code First from database" and click Next.
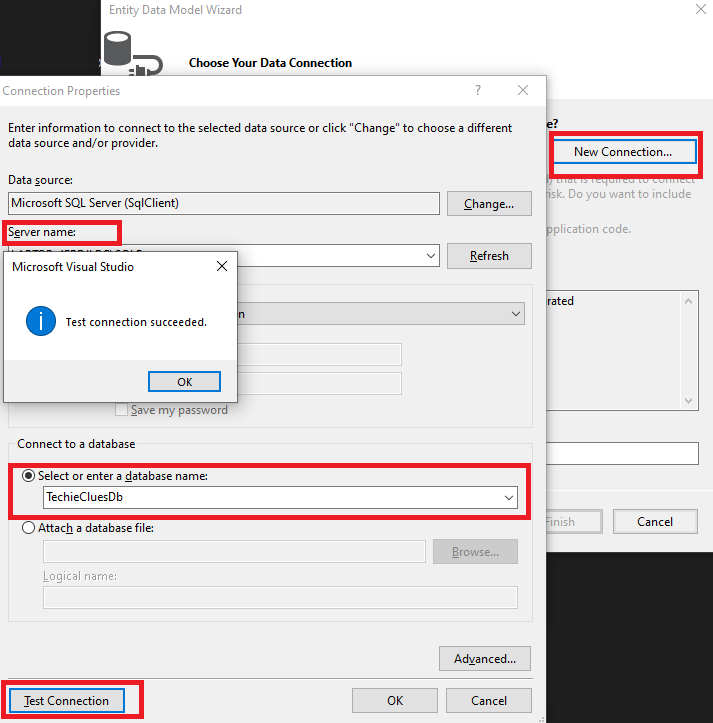
In the "Entity Data Model Wizard", select the server to which you want to connect and use the database. To verify the database connection, click "Test Connection" after you choose the database.
Click Next in the below dialog.
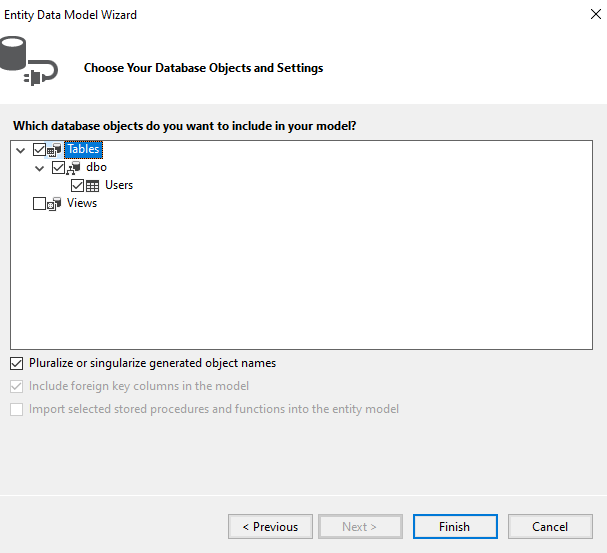
Choose corresponding "Table" as shown below and click Finish.
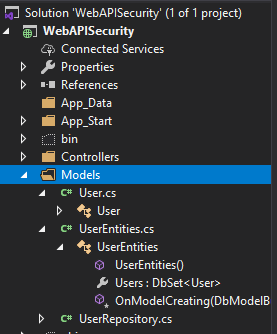
The data objects will be created under the Model folder as shown below,
Step 5: Create a repository
Add a class file named "UserRepository" and use the below code to connect the database and table using UserEntities context class.
using System;
using System.Collections.Generic;
using System.Linq;
using System.Web;

namespace WebAPISecurity.Models
{
    public class UserRepository : IDisposable
    {
        // UserEntities - your context class
        UserEntities context = new UserEntities();

        //To check and validate the user credentials
        public User ValidateUser(string username, string password)
        {
            return context.Users.FirstOrDefault(user =>
            user.Name.Equals(username, StringComparison.OrdinalIgnoreCase)
            && user.Password == password);
        }
        public void Dispose()
        {
            context.Dispose();
        }
    }
}
Step 5: Add API auth provider class
This class is used to validate the given credentials (username and password). If the credentials are valid then the token will be generated and the client will use this token to access the restricted resources later.
using System.Security.Claims;
using System.Threading.Tasks;
using Microsoft.Owin.Security.OAuth;
using WebAPISecurity.Models;

namespace WebAPISecurity
{
    public class ApiAuthProvider : OAuthAuthorizationServerProvider
    {
        public override async Task ValidateClientAuthentication(OAuthValidateClientAuthenticationContext context)
        {
            context.Validated();
        }
        // This method is used to validate the given credentials (username and password).
        public override async Task GrantResourceOwnerCredentials(OAuthGrantResourceOwnerCredentialsContext context)
        {
            using (UserRepository _repo = new UserRepository())
            {
                var user = _repo.ValidateUser(context.UserName, context.Password);
                if (user == null)
                {
                    context.SetError("invalid_grant", "Provided username and password is incorrect");
                    return;
                }
                var identity = new ClaimsIdentity(context.Options.AuthenticationType);
                identity.AddClaim(new Claim(ClaimTypes.Role, user.UserRole));
                identity.AddClaim(new Claim(ClaimTypes.Name, user.Name));
                context.Validated(identity);
            }
        }
    }
}
Step7: Add a Startup class
Add below the startup file and use the below code. We have to set TokenEndpointPath, AccessTokenExpireTimeSpan, and Provider as shown below,
using System;
using Microsoft.Owin;
using Owin;
using Microsoft.Owin.Security.OAuth;
using System.Web.Http;

[assembly: OwinStartup(typeof(WebAPISecurity.Startup))]

namespace WebAPISecurity
{
    public class Startup
    {
        public void Configuration(IAppBuilder app)
        {
            app.UseCors(Microsoft.Owin.Cors.CorsOptions.AllowAll);
            var myProvider = new ApiAuthProvider();
            OAuthAuthorizationServerOptions options = new OAuthAuthorizationServerOptions
            {
                AllowInsecureHttp = true,
                TokenEndpointPath = new PathString("/token"),
                AccessTokenExpireTimeSpan = TimeSpan.FromDays(1),
                Provider = myProvider
            };
            app.UseOAuthAuthorizationServer(options);
            app.UseOAuthBearerAuthentication(new OAuthBearerAuthenticationOptions());
            HttpConfiguration config = new HttpConfiguration();
            WebApiConfig.Register(config);
        }
    }
}
Step 8: Add a Web API Controller
Add an empty Web API controller by right-clicking the "Controllers" folder, Select Add > Controllers > Web API > Web API 2 Controller - Empty, and add the below code in the controller.
using System;
using System.Collections.Generic;
using System.Linq;
using System.Net;
using System.Net.Http;
using System.Web.Http;
using System.Security.Claims;

namespace WebAPISecurity.Controllers
{
    public class UserController : ApiController
    {
        // This resource can accessible for everyone. No restrictions.
        [AllowAnonymous]
        [HttpGet]
        [Route("api/server/info")]
        public IHttpActionResult Get()
        {
            return Ok("Server time is: " + DateTime.Now.ToString());
        }

        // This resource can be accessible for only for admin and user.
        [Authorize(Roles = "Admin, User")]
        [HttpGet]
        [Route("api/user/normal")]
        public IHttpActionResult ResourceUser()
        {
            var identity = (ClaimsIdentity)User.Identity;
            var roles = identity.Claims
                        .Where(c => c.Type == ClaimTypes.Role)
                        .Select(c => c.Value);
            return Ok("Hello " + identity.Name + "; Your role is : " + string.Join(",", roles.ToList()));
        }

        // This resource can be accessible only for admin.
        [Authorize(Roles = "Admin")]
        [HttpGet]
        [Route("api/user/admin")]
        public IHttpActionResult ResourceAdmin()
        {
            var identity = (ClaimsIdentity)User.Identity;
            var roles = identity.Claims
                        .Where(c => c.Type == ClaimTypes.Role)
                        .Select(c => c.Value);
            return Ok("Hello " + identity.Name + "; Your role is : " + string.Join(",", roles.ToList()));
        }
    }
}
Now, we have 3 routes in the ASP.NET Web API,
- /api/server/info - This resource can be accessible for everyone. No restrictions to access this resource or route.
- /api/user/normal - This resource can be accessed only by admin and user roles.
- /api/user/admin - This resource can be accessed only by the admin role.
Step 9: Testing the Web API
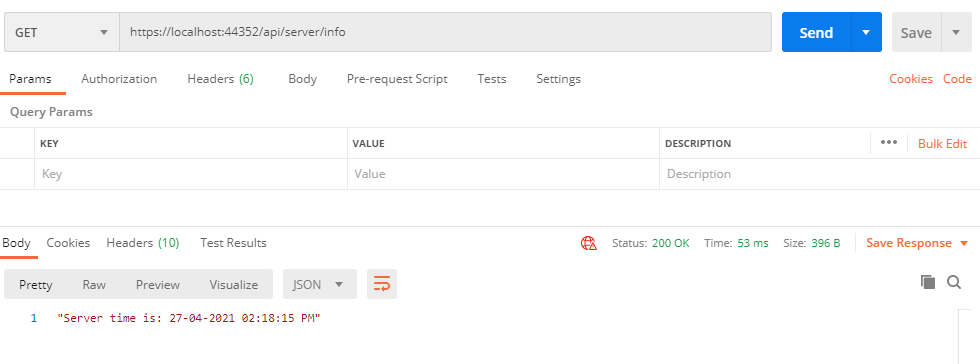
Anyone can access the below route or resource without any credentials and tokens because we used the AllowAnonymous attribute. so there are no restrictions to this resource.
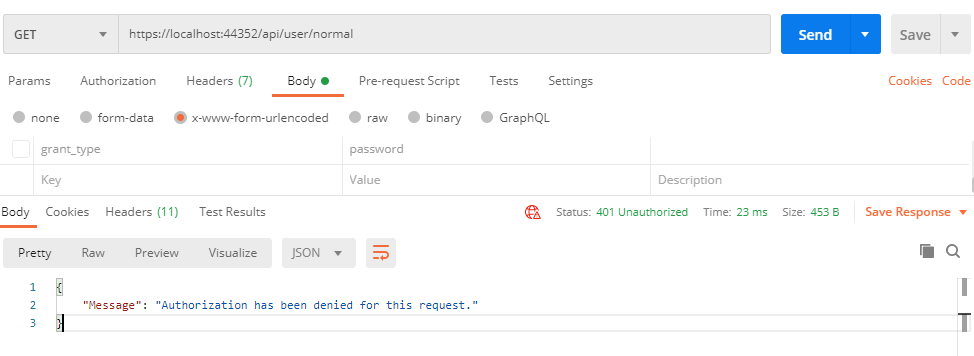
If we try to call this route, then it will through the below error message since only authorized users can only access this route or resource. So we need to create a token for the valid user and send it to the resource in order to get the response.
How to create a token on Web API?
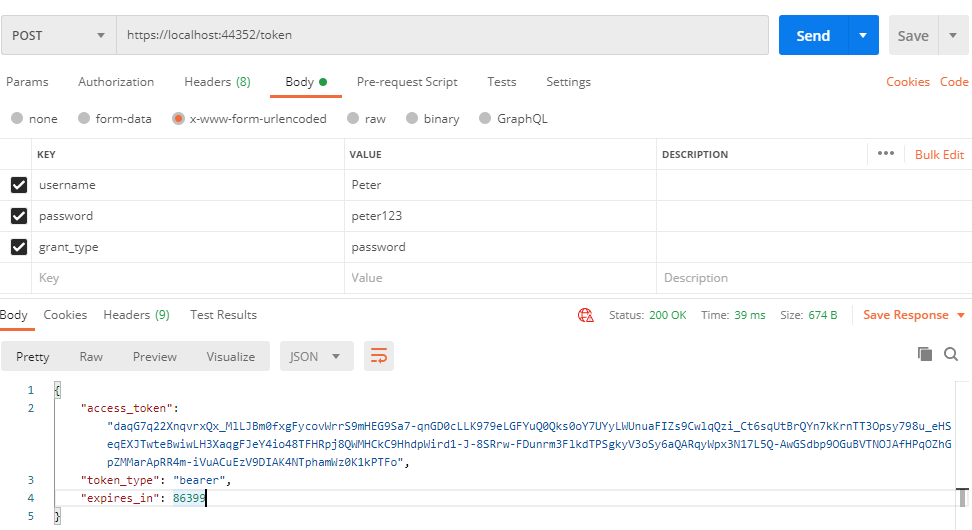
To create a token, we should pass the valid credentials to the server to validate as shown below, The server will send you the token once it validates the credentials.
The credentials (username and password) and grant_type should be passed in the body. The format should be "x-www-form-urlencoded".
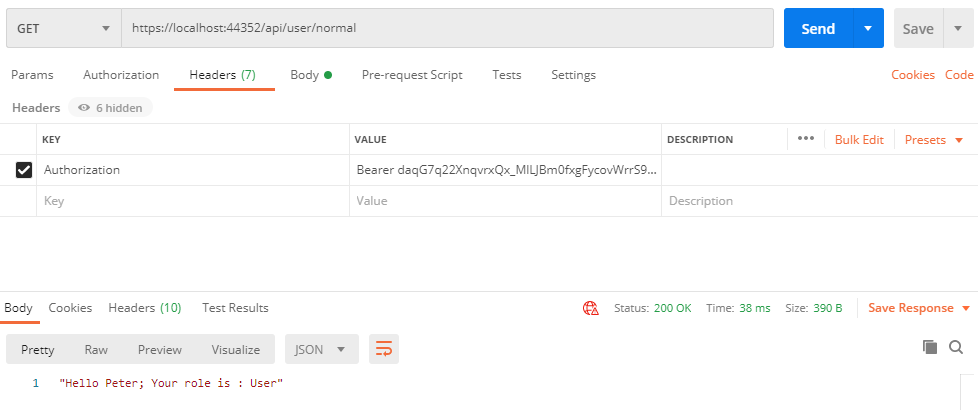
Once we received a token from the server for the user, then we can pass the token via header as shown below,
Format:
Authorization: Bearer [Access_Token]
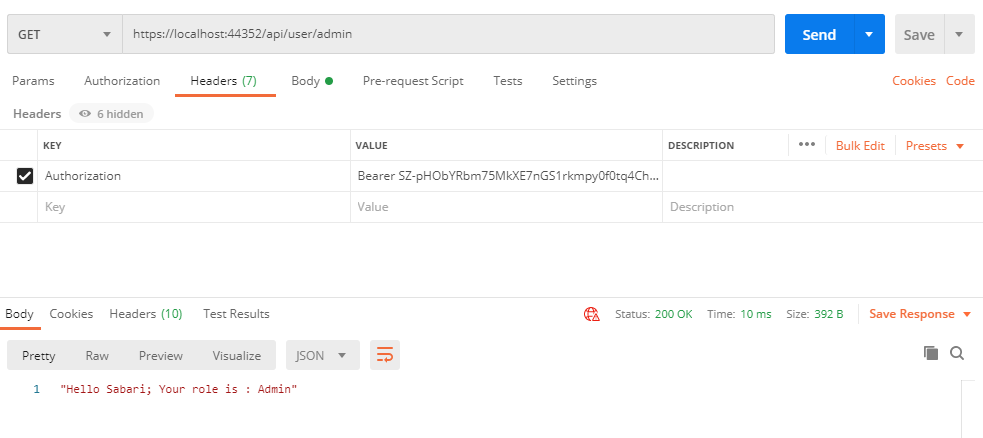
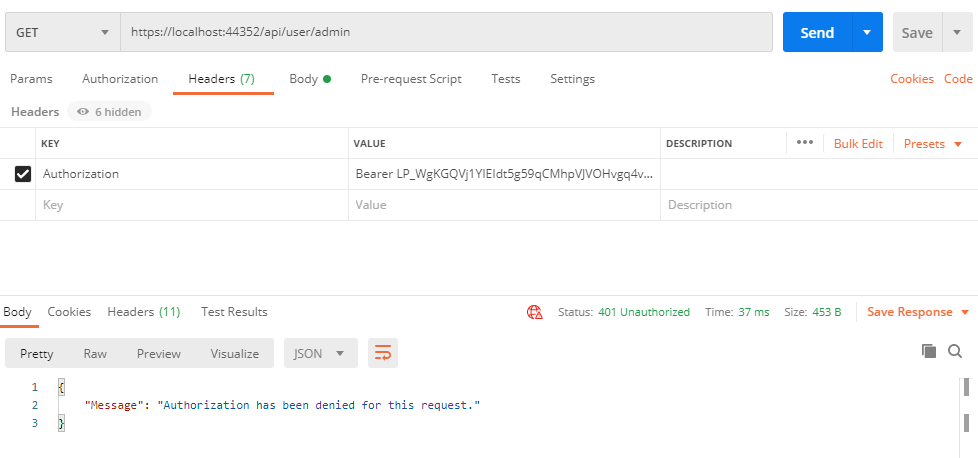
Similar to this, we can create a token for the admin user (Sabari) and pass the corresponding token to the route (/api/user/admin). This route only allows the admin user only.
If a normal user tries to invoke this route, then they will get the below error message.
Conclusion:
This article explored the concept of token-based authentication and provided a detailed step-by-step guide on how to implement it in an ASP.NET Web API application. Token-based authentication offers several advantages, including scalability, loose coupling, and mobile-friendliness. By following the outlined procedure, developers can easily incorporate token-based authentication to enhance the security and usability of their web APIs. By leveraging tokens, they can effectively authenticate users and control access to restricted resources.
Comments (0)