
Introduction:
In the previous article(Create a Simple Windows Application In C# (CRUD Operation) - Part 1), we explored the initial steps of creating a Windows application using C#, including designing forms, adding controls, and setting up a database with tables. In this continuation article, we will dive deeper into the development process by establishing a database connection, implementing CRUD (Create, Read, Update, Delete) operations, and integrating these functionalities into a Windows Forms application. By the end, you will have a comprehensive understanding of how to build a basic CRUD application using C# and Windows Forms.
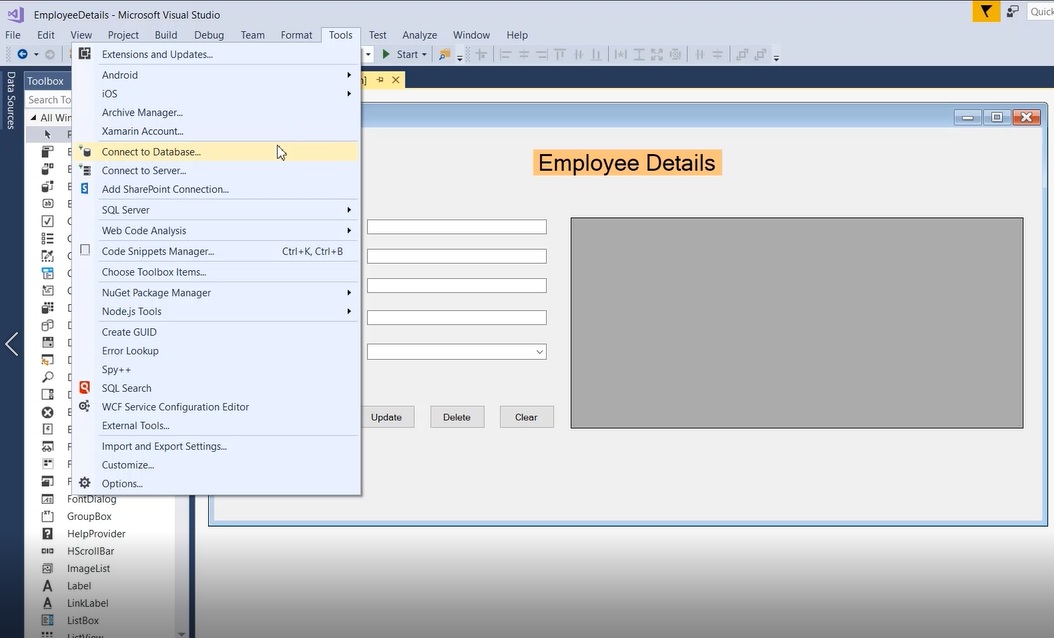
Step 1: Connecting the Database to the Windows Application
To establish a connection between the Windows application and the database, follow these steps:
Go to the Tools menu and click on "Connect to Database."
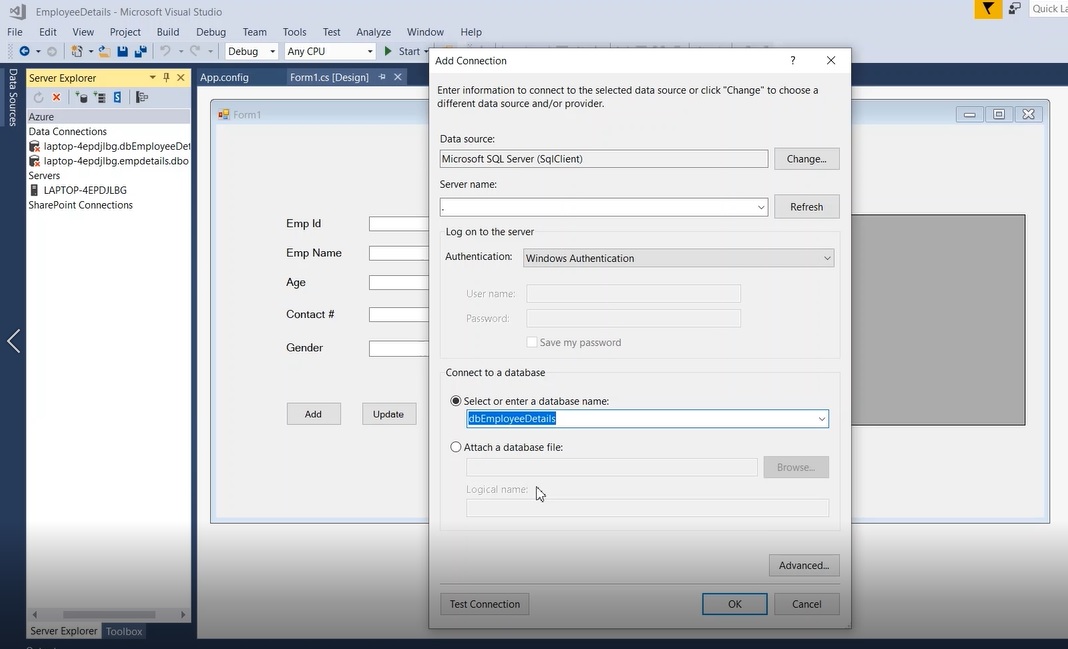
Step 2:
In the dialog box, select Microsoft SQL Server (SQL Client) as the data source.
Provide the server name as either "." or "localhost" and choose the desired database from the dropdown, such as "dbEmployeeDetails."
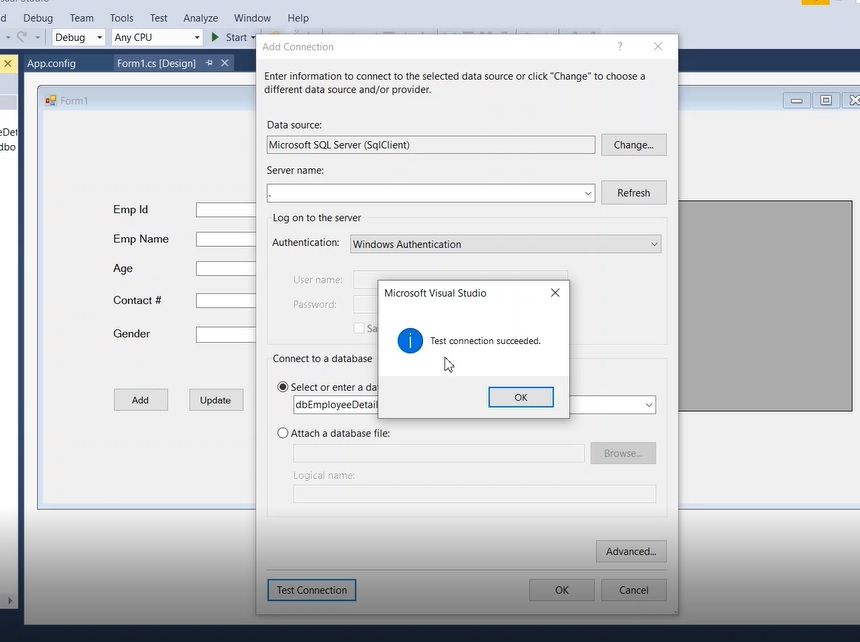
Step 3:
Click the "Test Connection" button to verify the database connection. A success message should appear if the connection is established.
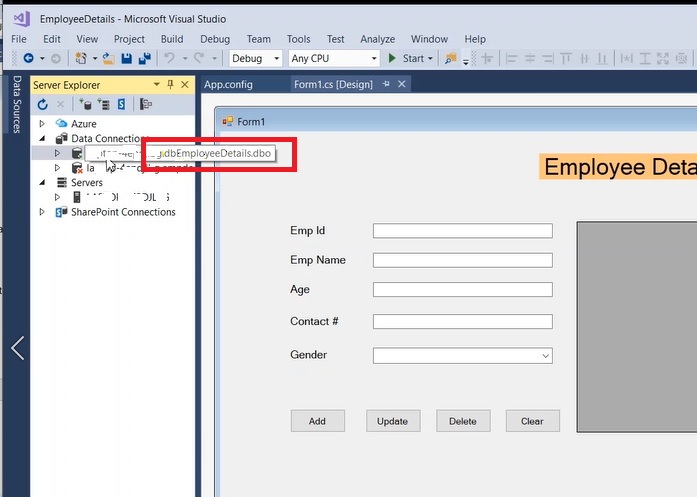
Step 4:
Once the database connection is established, the connection details will be visible.
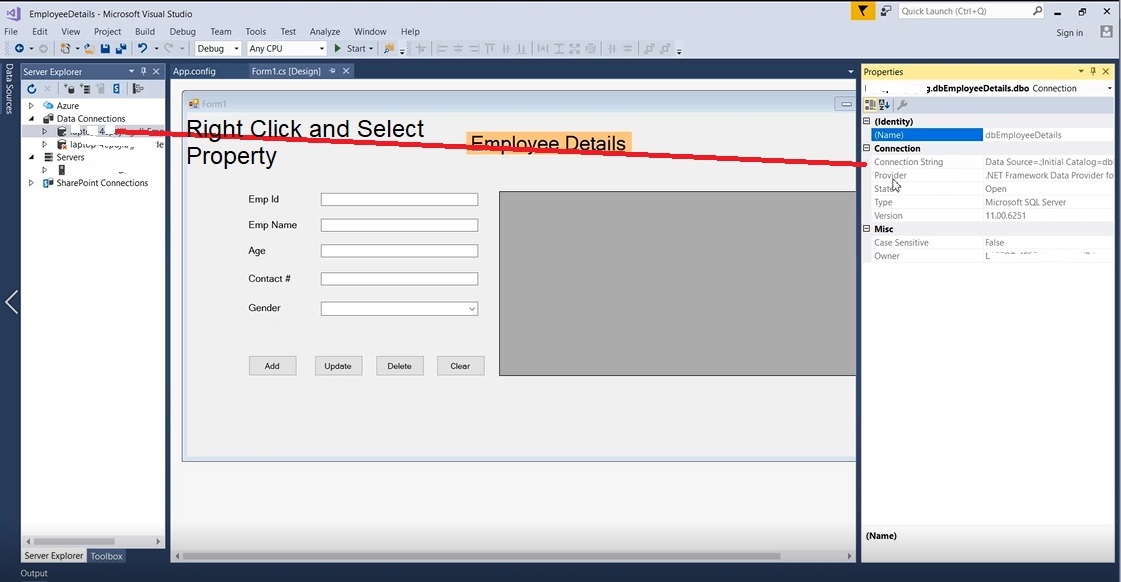
Step 5: Obtaining the Connection String
To acquire the connection string, follow these steps:
- Right-click on the database connection and select "Properties."
- Copy the "Connection string" for future reference.
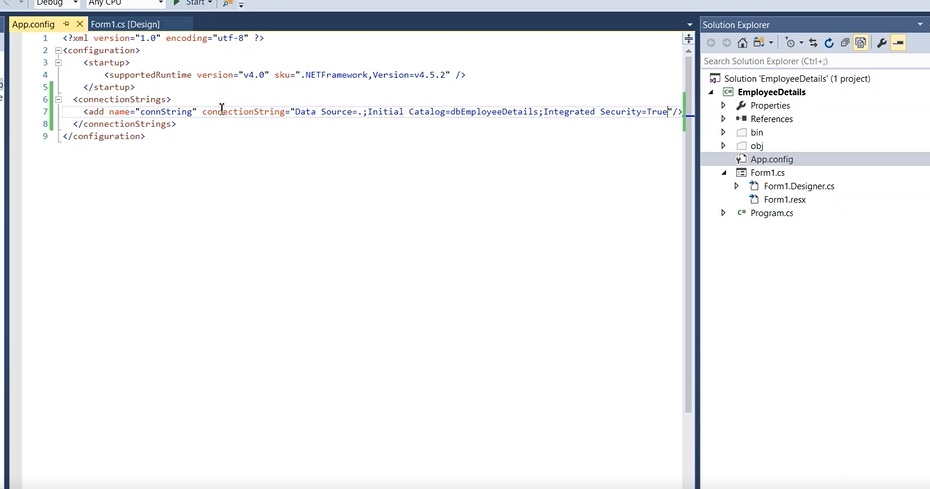
Step 6: Adding the Connection String to "App.config"
To utilize the connection string, it needs to be added to the "App.config" file using the following steps:
- Open the "App.config" file.
- Include the connection string within the configuration section.
Step 7: Inserting Employee Details
To insert employee details into the database, follow these steps:
- Create an Employee class with properties such as EmpId, EmpName, Age, and ContactNo.
public class Employee
{
	public string EmpId { get; set; }
	public string EmpName { get; set; }
	public string Age { get; set; }
	public string ContactNo { get; set; }
}
Retrieve the connection string from the App.config file using ConfigurationManager.
private static string myConn = ConfigurationManager.ConnectionStrings["connString"].ConnectionString;
Implement the InsertEmployee method that accepts employee details, establishes a SQL connection, and executes an INSERT query to add the employee details to the database. The method should return true if the insertion is successful; otherwise, it should return false.
private const string InsertQuery = "Insert Into Emp_details(EmpId, EmpName, EmpAge, EmpContact, EmpGender) Values (@EmpId, @EmpName, @EmpAge, @EmpContact, @EmpGender)";

public bool InsertEmployee(Employee employee)
{
	int rows;
	using (SqlConnection con = new SqlConnection(myConn))
	{
		con.Open();
		using (SqlCommand com = new SqlCommand(InsertQuery, con))
		{
			com.Parameters.AddWithValue("@EmpId", employee.EmpId);
			com.Parameters.AddWithValue("@EmpName", employee.EmpName);
			com.Parameters.AddWithValue("@EmpAge", employee.Age);
			com.Parameters.AddWithValue("@EmpContact", employee.ContactNo);
			com.Parameters.AddWithValue("@EmpGender", employee.Gender);
			rows = com.ExecuteNonQuery();
		}
	}
	return (rows > 0) ? true: false;
}
Step 8: Updating Employee Details
To update employee details in the database, follow these steps:
Implement the UpdateEmployee method, which accepts updated employee details. Open an SQL connection and execute an UPDATE query to modify the employee details in the database. Return true if the update is successful; otherwise, return false.
private const string UpdateQuery = "Update Emp_details set EmpName=@EmpName, EmpAge=@EmpAge, EmpContact=@EmpContact, EmpGender=@EmpGender where EmpId=@EmpId";

public bool UpdateEmployee(Employee employee)
{
	int rows;
	using (SqlConnection con = new SqlConnection(myConn))
	{
		con.Open();
		using (SqlCommand com = new SqlCommand(UpdateQuery, con))
		{
			com.Parameters.AddWithValue("@EmpName", employee.EmpName);
			com.Parameters.AddWithValue("@EmpAge", employee.Age);
			com.Parameters.AddWithValue("@EmpContact", employee.ContactNo);
			com.Parameters.AddWithValue("@EmpGender", employee.Gender);
			com.Parameters.AddWithValue("@EmpId", employee.EmpId);
			rows = com.ExecuteNonQuery();
		}
	}
	return (rows > 0) ? true : false;
}
Step 9: Deleting Employee Details
To delete employee details from the database, follow these steps:
Implement the DeleteEmployee method, which accepts an employee object or ID. Open an SQL connection and execute a DELETE query to remove the specified employee from the database. Return true if the deletion is successful; otherwise, return false.
private const string DeleteQuery = "Delete from Emp_details where EmpId=@EmpId";

public bool DeleteEmployee(Employee employee)
{
	int rows;
	using (SqlConnection con = new SqlConnection(myConn))
	{
		con.Open();
		using (SqlCommand com = new SqlCommand(DeleteQuery, con))
		{
			com.Parameters.AddWithValue("@EmpId", employee.EmpId);
			rows = com.ExecuteNonQuery();
		}
	}
	return (rows > 0) ? true : false;
}
Step 10: Retrieving Employee Details
To retrieve employee details from the database, follow these steps:
Implement the GetEmployees method, which returns a DataTable object containing all the employees stored in the database. Establish an SQL connection, execute a SELECT query, and populate the DataTable with the retrieved data.
private const string SelectQuery = "Select * from Emp_details";

public DataTable GetEmployees()
{
	var datatable = new DataTable();
	using (SqlConnection con = new SqlConnection(myConn))
	{
		con.Open();
		using(SqlCommand com = new SqlCommand(SelectQuery, con))
		{
			using(SqlDataAdapter adapter = new SqlDataAdapter(com))
			{
				adapter.Fill(datatable);
			}
		}
	}
	return datatable;
}
The Employee class now looks likes the below,
using System;
using System.Collections.Generic;
using System.Configuration;
using System.Data;
using System.Data.SqlClient;
using System.Linq;
using System.Text;
using System.Threading.Tasks;

namespace EmployeeDetails
{
    class Employee
    {
        private static string myConn = ConfigurationManager.ConnectionStrings["connString"].ConnectionString;
        public string EmpId { get; set; }
        public string EmpName { get; set; }
        public string Age { get; set; }
        public string ContactNo { get; set; }
        public string Gender { get; set; }
        private const string SelectQuery = "Select * from Emp_details";
        private const string InsertQuery = "Insert Into Emp_details(EmpId, EmpName, EmpAge, EmpContact, EmpGender) Values (@EmpId, @EmpName, @EmpAge, @EmpContact, @EmpGender)";
        private const string UpdateQuery = "Update Emp_details set EmpName=@EmpName, EmpAge=@EmpAge, EmpContact=@EmpContact, EmpGender=@EmpGender where EmpId=@EmpId";
        private const string DeleteQuery = "Delete from Emp_details where EmpId=@EmpId";

        public DataTable GetEmployees()
        {
            var datatable = new DataTable();
            using (SqlConnection con = new SqlConnection(myConn))
            {
                con.Open();
                using(SqlCommand com = new SqlCommand(SelectQuery, con))
                {
                    using(SqlDataAdapter adapter = new SqlDataAdapter(com))
                    {
                        adapter.Fill(datatable);
                    }
                }
            }
            return datatable;
        }

        public bool InsertEmployee(Employee employee)
        {
            int rows;
            using (SqlConnection con = new SqlConnection(myConn))
            {
                con.Open();
                using (SqlCommand com = new SqlCommand(InsertQuery, con))
                {
                    com.Parameters.AddWithValue("@EmpId", employee.EmpId);
                    com.Parameters.AddWithValue("@EmpName", employee.EmpName);
                    com.Parameters.AddWithValue("@EmpAge", employee.Age);
                    com.Parameters.AddWithValue("@EmpContact", employee.ContactNo);
                    com.Parameters.AddWithValue("@EmpGender", employee.Gender);
                    rows = com.ExecuteNonQuery();
                }
            }
            return (rows > 0) ? true: false;
        }

        public bool UpdateEmployee(Employee employee)
        {
            int rows;
            using (SqlConnection con = new SqlConnection(myConn))
            {
                con.Open();
                using (SqlCommand com = new SqlCommand(UpdateQuery, con))
                {
                    com.Parameters.AddWithValue("@EmpName", employee.EmpName);
                    com.Parameters.AddWithValue("@EmpAge", employee.Age);
                    com.Parameters.AddWithValue("@EmpContact", employee.ContactNo);
                    com.Parameters.AddWithValue("@EmpGender", employee.Gender);
                    com.Parameters.AddWithValue("@EmpId", employee.EmpId);
                    rows = com.ExecuteNonQuery();
                }
            }
            return (rows > 0) ? true : false;
        }

        public bool DeleteEmployee(Employee employee)
        {
            int rows;
            using (SqlConnection con = new SqlConnection(myConn))
            {
                con.Open();
                using (SqlCommand com = new SqlCommand(DeleteQuery, con))
                {
                    com.Parameters.AddWithValue("@EmpId", employee.EmpId);
                    rows = com.ExecuteNonQuery();
                }
            }
            return (rows > 0) ? true : false;
        }
    }
}
Now we have completed all the operations and are able to Insert, Update, Delete, and Retrieve the employee details using the above methods.
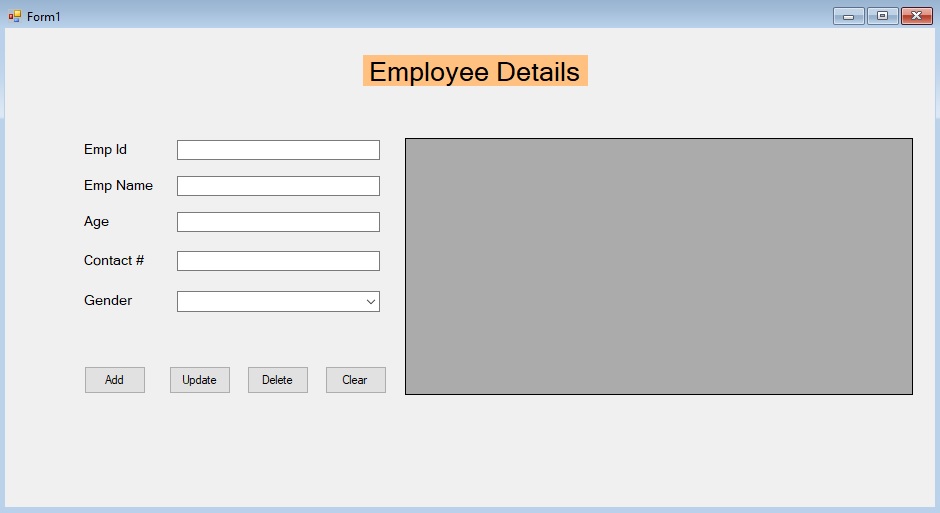
Step 11: CRUD Operations in Windows Forms
Now, let's integrate the CRUD operations into a Windows Forms application:
Double-click the "Add" button on the form, which will open the Form1.cs file and create the click event method.
It will automatically open the Form1.cs and creates the below click event method and we need to write a logic over here.
private void btnAdd_Click(object sender, EventArgs e)
{
}
The Form1.cs contains Add, Update, Delete, and Clear button click events when the user clicks the button then the event triggers and performs selected operations, as shown below.
using System;
using System.Windows.Forms;

namespace EmployeeDetails
{
    public partial class Form1 : Form
    {
        Employee employee = new Employee();
        public Form1()
        {
            InitializeComponent();
            dgvEmployeeDetails.DataSource = employee.GetEmployees();
        }
        // Add employee details when clicks the Add button
        private void btnAdd_Click(object sender, EventArgs e)
        {
            employee.EmpId = txtEmpId.Text;
            employee.EmpName = txtEmpName.Text;
            employee.Age = txtAge.Text;
            employee.ContactNo = txtContactNo.Text;
            employee.Gender = cboGender.SelectedItem.ToString();
            // Call Insert Employee method to insert the employee details to database
            var success = employee.InsertEmployee(employee);
            // Refresh the grid to show the updated employee details
            dgvEmployeeDetails.DataSource = employee.GetEmployees();
            if (success)
            {
               // Clear controls once the employee is inserted successfully
                ClearControls();
                MessageBox.Show("Employee has been added successfully");
            }
            else
                MessageBox.Show("Error occured. Please try again...");
        }
        // Update selected employee details when clicks the update button
        private void btnUpdate_Click(object sender, EventArgs e)
        {
            employee.EmpId = txtEmpId.Text;
            employee.EmpName = txtEmpName.Text;
            employee.Age = txtAge.Text;
            employee.ContactNo = txtContactNo.Text;
            employee.Gender = cboGender.SelectedItem.ToString();
            // Call Update Employee method to update the selected employee details to database
            var success = employee.UpdateEmployee(employee);
            // Refresh the grid to show the updated employee details
            dgvEmployeeDetails.DataSource = employee.GetEmployees();
            if (success)
            {
               // Clear controls once the employee is inserted successfully
                ClearControls();
                MessageBox.Show("Employee has been added successfully");
            }
            else
                MessageBox.Show("Error occured. Please try again...");
        }
        // Delete selected employee when clicks the delete button
        private void btnDelete_Click(object sender, EventArgs e)
        {
            employee.EmpId = txtEmpId.Text;
            // Call DeleteEmployee method to delete the selected employee from database
            var success = employee.DeleteEmployee(employee);
            // Refresh the grid to show the updated employee details
            dgvEmployeeDetails.DataSource = employee.GetEmployees();
            if (success)
            {
               // Clear controls once the employee is inserted successfully
                ClearControls();
                MessageBox.Show("Employee has been added successfully");
            }
            else
                MessageBox.Show("Error occured. Please try again...");
        }
        // Clear all controls when clicks clear button
        private void btnClear_Click(object sender, EventArgs e)
        {
            ClearControls();
        }

        private void ClearControls()
        {
            txtEmpId.Text = "";
            txtEmpName.Text = "";
            txtAge.Text = "";
            txtContactNo.Text = "";
            cboGender.Text = "";
        }
        // This data grid event triggers when select the grid rows and populate the controls with selected employee details
        private void dgvEmployeeDetails_RowHeaderMouseClick(object sender, DataGridViewCellMouseEventArgs e)
        {
            var index = e.RowIndex;
            txtEmpId.Text = dgvEmployeeDetails.Rows[index].Cells[0].Value.ToString();
            txtEmpName.Text = dgvEmployeeDetails.Rows[index].Cells[1].Value.ToString();
            txtAge.Text = dgvEmployeeDetails.Rows[index].Cells[2].Value.ToString();
            txtContactNo.Text = dgvEmployeeDetails.Rows[index].Cells[3].Value.ToString();
            cboGender.Text = dgvEmployeeDetails.Rows[index].Cells[4].Value.ToString();
        }
    }
}
By integrating these event handlers and updating the LoadEmployees method, you can now perform CRUD operations in your Windows Forms application. The application will allow you to add, update, and delete employee details from the connected database. The DataGridView will display the list of employees retrieved from the database.
Remember to handle any exceptions and implement proper validation and error checking to ensure the application's stability and reliability.
Output:
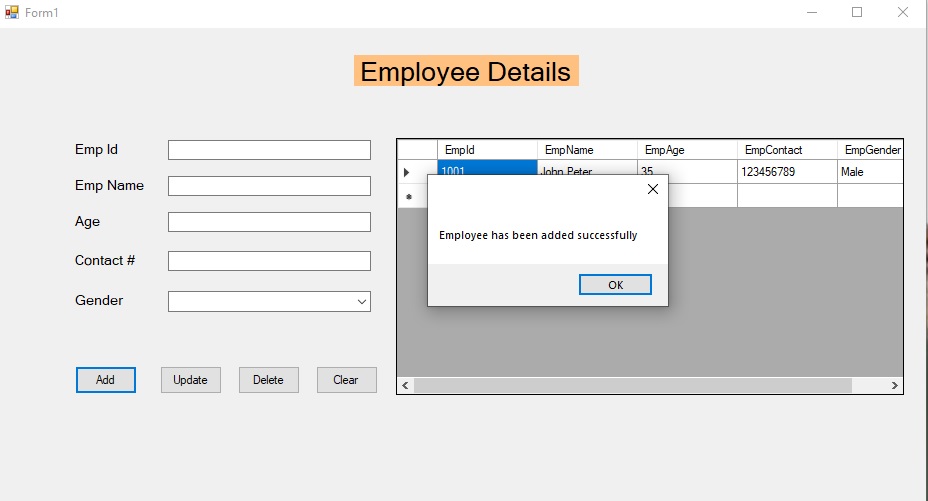
Add employee details and Click the "Add" button,
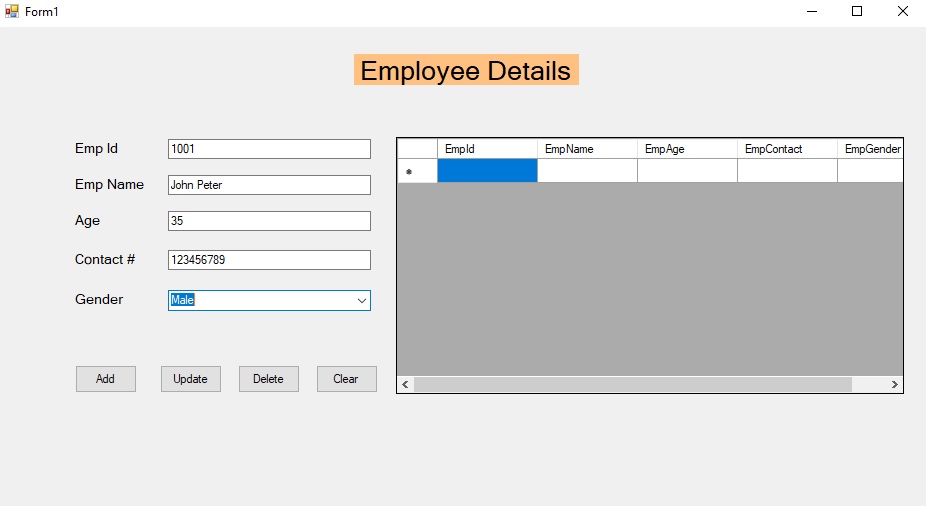
The employee details are successfully inserted.
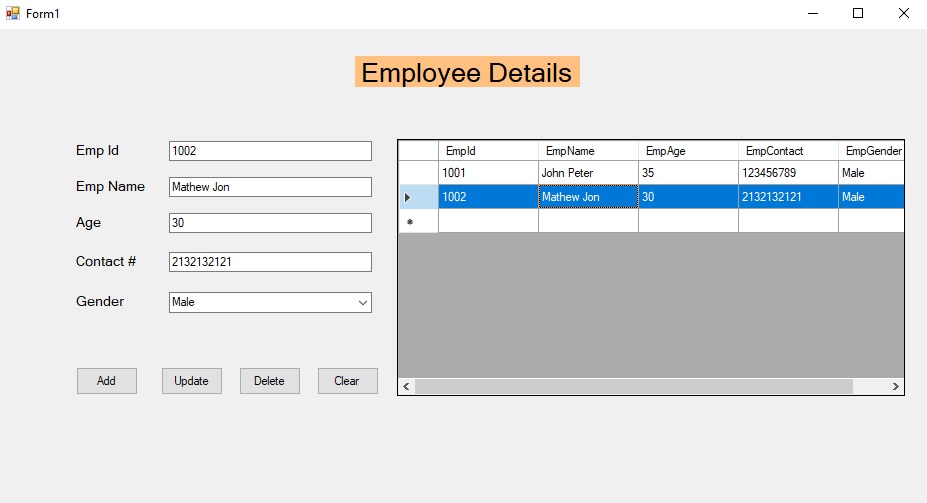
When you select the grid row (employee) selected employee details will be populated in the controls for Update or Delete purposes
Conclusion:
In conclusion, this two-part tutorial provided a step-by-step guide on building a simple Windows application using C# and Windows Forms. We focused on implementing CRUD (Create, Read, Update, Delete) operations for managing employee details in a connected database.
In Part 1, we covered the initial setup, including creating the user interface with input controls and a DataGridView, establishing a database connection using ADO.NET, and implementing the necessary database operations.
In Part 2, we focused on the code implementation. We discussed retrieving and displaying employee details from the database, handling user interactions with event handlers, and performing CRUD operations (adding, updating, and deleting employees).
By following these tutorials, you can create a functional Windows application that allows users to manage employee records. The provided code snippets serve as a starting point, and you can customize and expand upon them to meet your specific requirements.
Remember to handle exceptions, validate user inputs, and implement error checking to ensure the application's reliability and stability.
Building applications with CRUD operations is a fundamental aspect of software development, and this tutorial provides a solid foundation for further exploration and learning in the realm of Windows application development using C# and Windows Forms. Happy coding!


You are missing many steps! What should we name the labels, text boxes, and other elements on the designer? Incorrect names and the code breaks.