
As we know, we can use NLog to log the various application-level information in ASP.NET Core applications. There are multiple ways that we can store the captured logs like in a local file or database.
If you want to store the logs in the local file then please read this article Logging in ASP.NET Core Application with NLog (Local file).
In this article, we will see how to configure NLog and store the logs in the database with the ASP.NET Core application.
Step 1:
- Open Visual Studio 2019 and Select "Create a New Project". Next dialog, Select "ASP.NET Core Web Application" and click Next.
- Next dialog, provide Project Name, Location, and Solution Name.
- Select the ASP.NET Core Web App (Model-View-Controller) template and click Create.
Step 2: Install NLog package
In order to Install the NLog package, Go to Tools > NuGet Package Manager > Package Manager Console.
Use below command and package name to install NLog dependency using NuGet,
PM> Install-Package NLog
PM> Install-Package NLog.Web.AspNetCore
PM> Install-Package System.Data.SqlClient
Step 3: Create an MSSQL Database and Table
Use the below command to create a new database in the SQL server.
Create Database DemoDatabase
Go
Use DemoDatabase
Go
Execute below DDL script to create a new database table TcLogs for our testing.
CREATE TABLE [dbo].[TcLogs](
	[Id] [int] IDENTITY(1,1) NOT NULL,
	[Level] [nvarchar](15) NOT NULL,
	[Message] [nvarchar](max) NOT NULL,
	[LogDate] [datetime] NOT NULL,
	[Exception] [nvarchar](max) NOT NULL,
	[CallSite] [nvarchar](max) NULL,
	[Trace] [nvarchar](max) NOT NULL,
	[Logger] [nvarchar](max) NOT NULL
 CONSTRAINT [PK_TcLogs] PRIMARY KEY CLUSTERED
(
	[Id] ASC
)WITH (PAD_INDEX = OFF, STATISTICS_NORECOMPUTE = OFF, IGNORE_DUP_KEY = OFF, ALLOW_ROW_LOCKS = ON, ALLOW_PAGE_LOCKS = ON) ON [PRIMARY]
) ON [PRIMARY]
Step 3: NLog Configuration - Config file
The NLog configuration file is a simple XML file that is used to hold the config settings related to NLog. The "NLog.config" file will be created in the root folder of the project while installing the NLog dependencies. If not, then create an "NLog.config" file under the root folder of the project.
<?xml version="1.0" encoding="utf-8" ?>
<nlog xmlns="http://www.nlog-project.org/schemas/NLog.xsd"
      xmlns:xsi="http://www.w3.org/2001/XMLSchema-instance"
      xsi:schemaLocation="http://www.nlog-project.org/schemas/NLog.xsd NLog.xsd"
      autoReload="true" internalLogLevel="Info"
internalLogFile="c:\temp\internal-nlog.txt">
  <targets>
    <target xsi:type="Database"
         name="databaseTarget"
         connectionString="data source=LAPTOP-3ABCDE\SQLExpress;initial catalog=DemoDatabase;Integrated Security=True;Connect Timeout=30;Encrypt=False;TrustServerCertificate=True;ApplicationIntent=ReadWrite;MultiSubnetFailover=False"
         commandText="INSERT INTO [TcLogs](Level,Message,LogDate,Exception, CallSite, Trace,Logger) VALUES (@level,@messsge,getutcdate(),@exception,@callSite,@trace,@logger)">
      <parameter name="@level" layout="${level}" />
      <parameter name="@messsge" layout="${message}" />
      <parameter name="@exception" layout="${exception:tostring}" />
      <parameter name="@callSite" layout="${callsite:filename=true}" />
      <parameter name="@trace" layout="${trace}" />
      <parameter name="@logger" layout="${logger}" />
    </target>
  </targets>

 <rules>
   <logger name="*" minlevel="Trace" writeTo="databaseTarget" />
  </rules>
</nlog>
For more information about the Layout renderers, please read this article Logging in ASP.NET Core Application with NLog (Local file).
In the above configuration file, we have updated the target details,
- name: Mention custom target name. It should be the same as writeTo field in the Rules tag.
- type: Target type Database or File. (To store logs in a database, enter "Database").
- connectionString: Configure connection string.
- commandText: Configure DML command which inserts logs into the database table.
The "Nlog.config" file needs to be copied to the build directory every time you build the application. So we need to change the property settings for this file, right-click on NLog.config and click properties and change the value for ‘Copy to output directory" to ‘Copy Always’ or ‘Copy if newer’ (please refer this article for more info : Logging in ASP.NET Core Application with NLog (Local file)).
Step 4: NLog Configuration - Asp.Net Core
In the Program.cs file and update the below code.
using Microsoft.AspNetCore;
using Microsoft.AspNetCore.Hosting;
using Microsoft.Extensions.Configuration;
using Microsoft.Extensions.Hosting;
using Microsoft.Extensions.Logging;
using NLog.Web;
using System;
using System.Collections.Generic;
using System.Linq;
using System.Threading.Tasks;

namespace NLogExampleAspNetCore
{
    public class Program
    {
        public static void Main(string[] args)
        {
            var logger = NLog.Web.NLogBuilder.ConfigureNLog("NLog.config").GetCurrentClassLogger();
            try
            {
                logger.Debug("Application Started....");
                CreateHostBuilder(args).Build().Run();
            }
            catch (Exception exception)
            {
                logger.Error(exception, "Exception during execution.");
                throw;
            }
            finally
            {
                NLog.LogManager.Shutdown();
            }
        }

        public static IHostBuilder CreateHostBuilder(string[] args) =>
        Host.CreateDefaultBuilder(args)
            .ConfigureWebHostDefaults(webBuilder =>
            {
                webBuilder.UseStartup<Startup>();
            })
            .ConfigureLogging(logging =>
            {
                logging.ClearProviders();
                logging.SetMinimumLevel(Microsoft.Extensions.Logging.LogLevel.Trace);
            })
            .UseNLog();
    }
}
Step 5: How to test NLog database logging in ASP.NET Core application?
Update the below code in the Home controller to test the NLog logging.
public class HomeController : Controller
{
	private readonly ILogger<HomeController> _logger;

	public HomeController(ILogger<HomeController> logger)
	{
		_logger = logger;
	}

	public IActionResult Index()
	{
		_logger.LogInformation("Home Controller is Invoked");

		try
		{
			var val = 1;
			var i = val / 0;
		}
		catch
		{
			_logger.LogError("Exception thrown...");
		}
		new Exception("test");
		return View();
	}
}
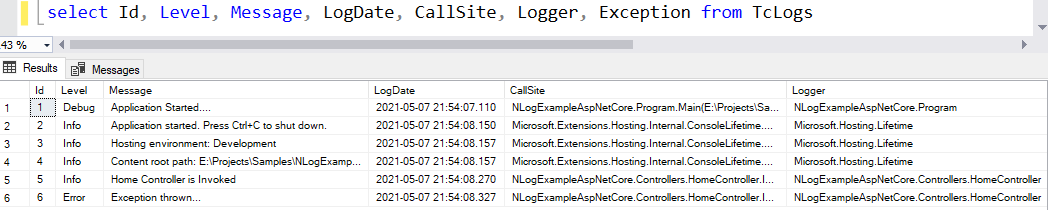
Now, Run the application and see the logs in the database table as shown below,
Note:
Sometimes the logs will not be stored in the database due to some unknown reason, so in order to find out the exact exceptions in the local file, made small config changes in the NLog.config file as shown below,
Add below two attributes in the NLog.config file,
internalLogLevel="Info"

internalLogFile="c:\temp\nlog-internal.txt"
<nlog xmlns="http://www.nlog-project.org/schemas/NLog.xsd"
      xmlns:xsi="http://www.w3.org/2001/XMLSchema-instance"
      xsi:schemaLocation="http://www.nlog-project.org/schemas/NLog.xsd NLog.xsd"
      autoReload="true" internalLogLevel="Info"
internalLogFile="c:\temp\nlog-internal.txt">
Comments (0)