
Introduction
Let's set up the angular application and design the web page where we create, retrieve, update, and delete details. We have RESTful API API with CRUD operations which we discussed in the article part 1. If you haven't read Part 1, then please go through the article Create and Build an ASP.NET Core Angular CRUD Application - Part 1.
We have an angular template already created with the ASP.NET Core template by Visual Studio. You will see the "ClientApp" folder in our solution as shown below, Which has the angular files (HTML, typescript, and config) and node modules.
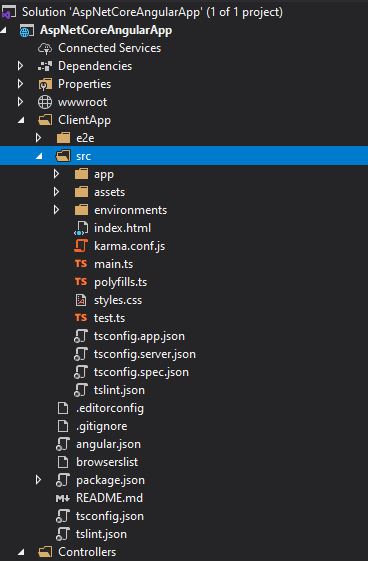
We are not going to use the predefined components and routes. We will use the app.component to design our page and integrate the CRUD operations (RESTful API).
Step 1: Install Required Packages
Before going to design our app, we need to install @angular/material and require dependencies. Go to the root folder of the angular application open Powershell and use the below commands to install the latest version of the material.
# Install the latest version
npm install --save @angular/material @angular/cdk @angular/animations

# Install Angular Material version 8  (Note : I have used Angular 8 so I mentioned the version as 8 for angular material)
npm install --save @angular/material@8 @angular/cdk@8 @angular/animations@8
Step 2: Add Material Theme in Style.css
Add the below line at the top of the Style.css file so that it will be used for the entire application if you want.
@import "~@angular/material/prebuilt-themes/deeppurple-amber.css";
Step 3: Import BrowserAnimationsModule
Go to app.module file then import BrowserAnimationsModule then add in imports array as shown below,
app.module.ts:
import { BrowserModule } from '@angular/platform-browser';
import { NgModule } from '@angular/core';
import { FormsModule } from '@angular/forms';
import { HttpClientModule, HTTP_INTERCEPTORS } from '@angular/common/http';
import { RouterModule } from '@angular/router';

import { AppComponent } from './app.component';
import { NavMenuComponent } from './nav-menu/nav-menu.component';
import { HomeComponent } from './home/home.component';
import { CounterComponent } from './counter/counter.component';
import { FetchDataComponent } from './fetch-data/fetch-data.component';

import { BrowserAnimationsModule } from '@angular/platform-browser/animations';

@NgModule({
  declarations: [
    AppComponent,
    NavMenuComponent,
    HomeComponent,
    CounterComponent,
    FetchDataComponent
  ],
  imports: [
    BrowserModule.withServerTransition({ appId: 'ng-cli-universal' }),
    HttpClientModule,
    FormsModule,
    BrowserAnimationsModule,
    RouterModule.forRoot([
      { path: '', component: HomeComponent, pathMatch: 'full' },
      { path: 'counter', component: CounterComponent },
      { path: 'fetch-data', component: FetchDataComponent },
    ])
  ],
  providers: [],
  bootstrap: [AppComponent]
})
export class AppModule { }
Step 4: Import Material Modules
We will use Table, Dialog, FormFields, Input, and Buttons as Material components in this article. To use the material components, we should import these components in the app.module.ts file and add to the imports array to use them in our application.
app.module.ts:
import { BrowserModule } from '@angular/platform-browser';
import { NgModule } from '@angular/core';
import { FormsModule } from '@angular/forms';
import { HttpClientModule, HTTP_INTERCEPTORS } from '@angular/common/http';
import { RouterModule } from '@angular/router';

import { AppComponent } from './app.component';
import { NavMenuComponent } from './nav-menu/nav-menu.component';
import { HomeComponent } from './home/home.component';
import { CounterComponent } from './counter/counter.component';
import { FetchDataComponent } from './fetch-data/fetch-data.component';
import { BrowserAnimationsModule } from '@angular/platform-browser/animations';

import {
  MatTableModule,
  MatDialogModule,
  MatFormFieldModule,
  MatInputModule,
  MatButtonModule
} from '@angular/material';

@NgModule({
  declarations: [
    AppComponent,
    NavMenuComponent,
    HomeComponent,
    CounterComponent,
    FetchDataComponent
  ],
  imports: [
    BrowserModule.withServerTransition({ appId: 'ng-cli-universal' }),
    HttpClientModule,
    FormsModule,
    BrowserAnimationsModule,
    MatTableModule,
    MatDialogModule,
    MatFormFieldModule,
    MatInputModule,
    MatButtonModule,
    MatInputModule,
    RouterModule.forRoot([
      { path: '', component: HomeComponent, pathMatch: 'full' },
      { path: 'counter', component: CounterComponent },
      { path: 'fetch-data', component: FetchDataComponent },
    ])
  ],
  providers: [],
  bootstrap: [AppComponent]
})
export class AppModule { }
Step 5: Create a Material Table and Controls
In our example, We will use employee details and how to create, update, and delete employee details & retrieve all the employees, and display it in the table.
We will use SPA(Single Page Application) to consume all the operations such as CRUD (Create Retrieve, Update, and Delete). Below the code, you can see the Material Table directive in app.component.html
app.component.html:
#mytable is a template variable that is used to refresh table data by calling renderRows() method. *matHeaderRowDef is used to render an array of columns that we want to display in the table. matColumnDef property on the column is the same as a key in the JSON data object. *matHeaderCellDef has the text of columns in the table header.
<div class="container">
  <button mat-button (click)="openDialog('Add',{})" mat-flat-button color="primary">Add Employee</button>
  <table mat-table [dataSource]="dataSource" #mytable class="my-table mat-elevation-z8">
    <ng-container matColumnDef="name">
      <th mat-header-cell *matHeaderCellDef> Name </th>
      <td mat-cell *matCellDef="let element"> {{element.name}} </td>
    </ng-container>

    <ng-container matColumnDef="age">
      <th mat-header-cell *matHeaderCellDef> Age </th>
      <td mat-cell *matCellDef="let element"> {{element.age}} </td>
    </ng-container>

    <ng-container matColumnDef="designation">
      <th mat-header-cell *matHeaderCellDef> Designation </th>
      <td mat-cell *matCellDef="let element"> {{element.designation}} </td>
    </ng-container>


    <ng-container matColumnDef="mobileNumber">
      <th mat-header-cell *matHeaderCellDef> MobileNumber </th>
      <td mat-cell *matCellDef="let element"> {{element.mobileNumber}} </td>
    </ng-container>

    <ng-container matColumnDef="action">
      <th mat-header-cell *matHeaderCellDef> Action </th>
      <td mat-cell *matCellDef="let element" class="action-link">
        <a (click)="openDialog('Update',element)">Edit</a> |
        <a (click)="openDialog('Delete',element)">Delete</a>
      </td>
    </ng-container>

    <tr mat-header-row *matHeaderRowDef="displayedColumns"></tr>
    <tr mat-row *matRowDef="let row; columns: displayedColumns;"></tr>
  </table>
</div>
app.component.ts:
import { Component, ViewChild, Inject } from '@angular/core';
import { MatDialog, MatTable } from '@angular/material';
import { DialogBoxComponent } from './dialog-box/dialog-box.component';
import { HttpClient } from '@angular/common/http';

export interface UsersData {
  name: string;
  id: number;
}

@Component({
  selector: 'app-root',
  templateUrl: './app.component.html'
})

export class AppComponent {
  displayedColumns: string[] = ['name', 'age', 'designation', 'mobileNumber', 'action'];
  dataSource: any;
  public employee: Employee;
  @ViewChild(MatTable,{static:true}) table: MatTable<any>;

  constructor(public dialog: MatDialog, public http: HttpClient, @Inject('BASE_URL') public baseUrl: string) {
    http.get<Employee[]>(baseUrl + 'api/employees').subscribe(result => {
       this.dataSource = result;
    }, error => console.error(error));
  }

  openDialog(action,obj) {
    obj.action = action;
    const dialogRef = this.dialog.open(DialogBoxComponent, {
      width: '300px',
      data:obj
    });

    dialogRef.afterClosed().subscribe(result => {
      if(result.event == 'Add'){
        this.addRowData(result.data);
      }else if(result.event == 'Update'){
        this.updateRowData(result.data);
      }else if(result.event == 'Delete'){
        this.deleteRowData(result.data);
      }
    });
  }

  addRowData(newRow){
    this.dataSource.push({
      name:newRow.name,
      age:newRow.age,
      designation:newRow.designation,
      mobileNumber:newRow.mobileNumber
    });

    this.employee = {
       name:newRow.name,
       age: parseInt(newRow.age),
       designation:newRow.designation,
       mobileNumber:parseInt(newRow.mobileNumber)
    };
    const headers = { 'content-type': 'application/json'}
    const body=JSON.stringify(this.employee);
    this.http.post<Employee>(this.baseUrl + 'api/Employees', body , {'headers':headers}).subscribe(data => {
    })

    this.table.renderRows();

  }
  updateRowData(newRow){
    this.dataSource = this.dataSource.filter((value,key)=>{
      if(value.id == newRow.id){
          value.name = newRow.name;
          value.age=newRow.age;
          value.designation=newRow.designation;
          value.mobileNumber=newRow.mobileNumber;
      }

      this.employee = {
        id: newRow.id,
        name:newRow.name,
        age: parseInt(newRow.age),
        designation:newRow.designation,
        mobileNumber:parseInt(newRow.mobileNumber)
      };
      const headers = { 'content-type': 'application/json'}
      const body=JSON.stringify(this.employee);
      this.http.put<Employee[]>(this.baseUrl + 'api/Employees/' + newRow.id, body , {'headers':headers}).subscribe(data => {
      })
      return true;
    });
  }
  deleteRowData(newRow){
    this.dataSource = this.dataSource.filter((value,key)=>{
       this.http.delete<any>(this.baseUrl + 'api/Employees/' + newRow.id).subscribe(data => {
      })
      return value.id != newRow.id;
    });
  }
}


interface Employee {
  id: string;
  name: number;
  age: number;
  designation: string;
  mobileNumber: string;
}
Add component dialog box by using the below command,
$ ng generate component dialog-box
Once you have generated the dialog box component, then the component details will be updated in app.module.ts file as shown below,
import { BrowserModule } from '@angular/platform-browser';
import { NgModule } from '@angular/core';
import { FormsModule } from '@angular/forms';
import { HttpClientModule, HTTP_INTERCEPTORS } from '@angular/common/http';
import { RouterModule } from '@angular/router';

import { AppComponent } from './app.component';
import { NavMenuComponent } from './nav-menu/nav-menu.component';
import { HomeComponent } from './home/home.component';
import { CounterComponent } from './counter/counter.component';
import { FetchDataComponent } from './fetch-data/fetch-data.component';
import { BrowserAnimationsModule } from '@angular/platform-browser/animations';
import { DialogBoxComponent } from './dialog-box/dialog-box.component';

import {
  MatTableModule,
  MatDialogModule,
  MatFormFieldModule,
  MatInputModule,
  MatButtonModule
} from '@angular/material';

@NgModule({
  declarations: [
    AppComponent,
    NavMenuComponent,
    HomeComponent,
    CounterComponent,
    FetchDataComponent,
    DialogBoxComponent
  ],
  imports: [
    BrowserModule.withServerTransition({ appId: 'ng-cli-universal' }),
    HttpClientModule,
    FormsModule,
    BrowserAnimationsModule,
    MatTableModule,
    MatDialogModule,
    MatFormFieldModule,
    MatInputModule,
    MatButtonModule,
    MatInputModule,
    RouterModule.forRoot([
      { path: '', component: HomeComponent, pathMatch: 'full' },
      { path: 'counter', component: CounterComponent },
      { path: 'fetch-data', component: FetchDataComponent },
    ])
  ],
   entryComponents: [
    DialogBoxComponent
  ],
  providers: [],
  bootstrap: [AppComponent]
})
export class AppModule { }
Add below code in dialog-box.component.html
<h1 mat-dialog-title><strong>{{action}} Employee</strong></h1>
<div mat-dialog-content>
<mat-form-field *ngIf="action != 'Delete'; else elseTemplate">
<input placeholder="Name" matInput [(ngModel)]="local_data.name">
</mat-form-field>
<mat-form-field *ngIf="action != 'Delete'; else elseTemplate">
<input placeholder="Age" matInput [(ngModel)]="local_data.age">
</mat-form-field>
<mat-form-field *ngIf="action != 'Delete'; else elseTemplate">
<input placeholder="Designation" matInput [(ngModel)]="local_data.designation">
</mat-form-field>
<mat-form-field *ngIf="action != 'Delete'; else elseTemplate">
<input placeholder="Mobile Number" matInput [(ngModel)]="local_data.mobileNumber">
</mat-form-field>
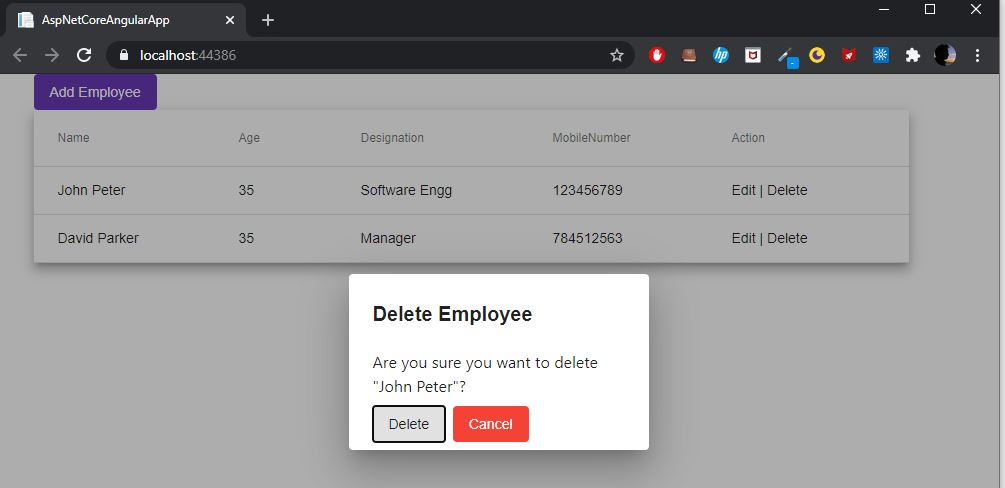
<div *ngIf="action == 'Delete'">Are you sure you want to delete "{{local_data.name}}"?</div>
</div>
<div mat-dialog-actions>
<button mat-button (click)="doAction()">{{action}}</button>
<button mat-button (click)="closeDialog()" mat-flat-button color="warn">Cancel</button>
</div>
Add the below code in dialog-box.component.ts
import { Component, Inject, Optional } from '@angular/core';
import { MatDialogRef, MAT_DIALOG_DATA } from '@angular/material';

export interface UsersData {
  name: string;
  id: number;
}
@Component({
  selector: 'app-dialog-box',
  templateUrl: './dialog-box.component.html',
  styleUrls: ['./dialog-box.component.css']
})
export class DialogBoxComponent {
  action:string;
  local_data:any;
  constructor(
    public dialogRef: MatDialogRef<DialogBoxComponent>,
    @Optional() @Inject(MAT_DIALOG_DATA) public data: UsersData) {
    console.log(data);
    this.local_data = {...data};
    this.action = this.local_data.action;
  }
  doAction(){
    this.dialogRef.close({event:this.action,data:this.local_data});
  }
  closeDialog(){
    this.dialogRef.close({event:'Cancel'});
  }
}
Screenshots:
Add Employee:
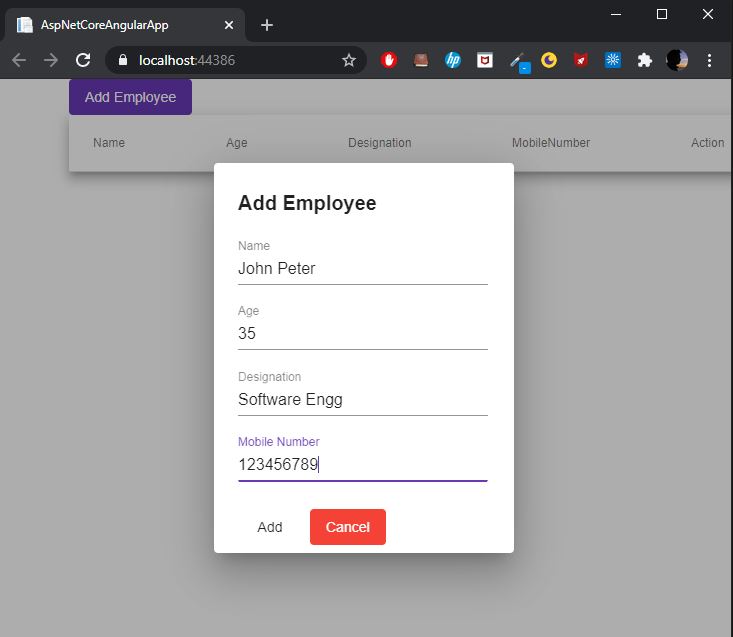
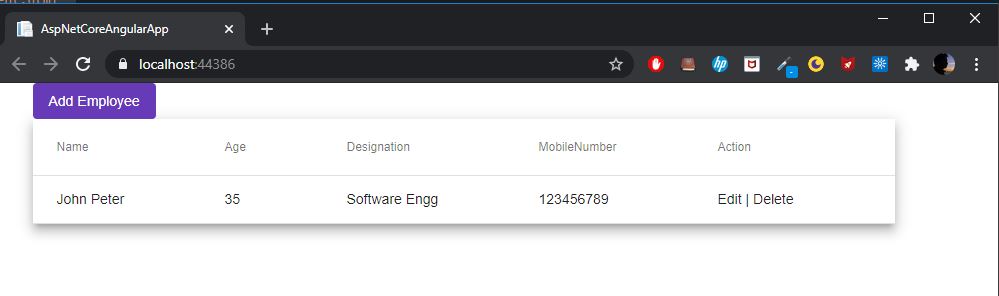
Once you have entered and clicked the "Add" button the Post method will be called and the employee data will be inserted into the database and displayed on the screen as shown below,
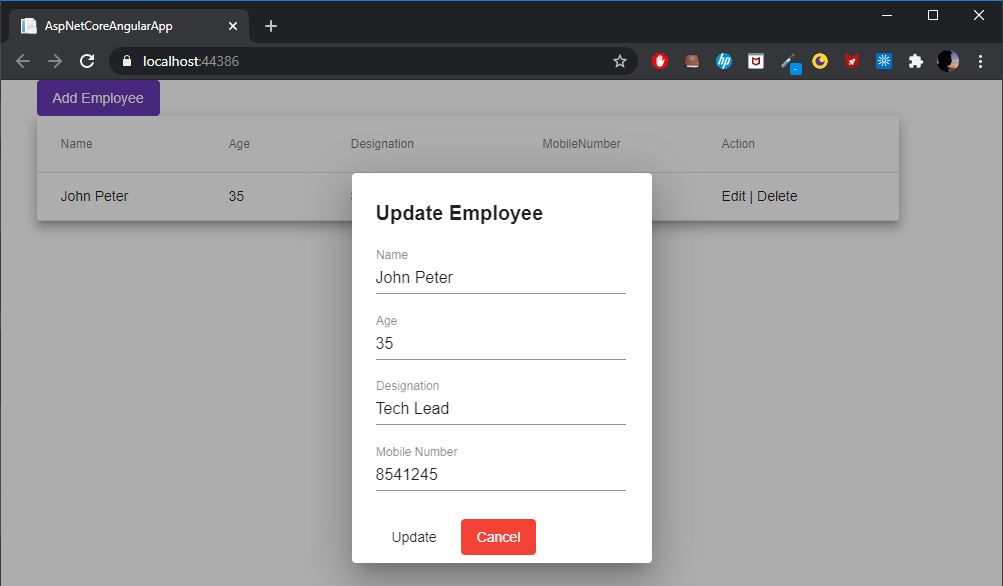
Update Employee:
Click edit the employee, click the edit button and update the employee details as shown below,
Delete Employee:


Very nice tutorial. Problem is I stuck on adding component dialog box ("ng generate component dialog-box"). I got error: "The generate command requires to be run in an Angular project, but a project definition could not be found." I did a lot of searching on the Internet and couldn't get solution. Please, help me to resolve it. Tom