
Approval Process in Salesforce
There might be a requirement in the org, where the Salesforce record needs to be approved. This approval is manual, but Salesforce allows it to make it automated with the Approval process. The approval process is made up of steps, that can either approve a record or can reject it. Here, the record can be created by a user or it can come from a queue or might be assigned by a group. The approval process will also state, what actions will be committed post-approval of the record or rejection of the record. The action could be suggested for possible recall of record. In short, the approval process in Salesforce will automate the complete approval process, which is otherwise done manually. A good example of auto-approval of leaves if it is less than two days. Many organizations have such policies. When the “leave” span is shorter such as one of two days, the leave is auto-approved, and an email notification is sent to both the employee and his supervisor. This is a classic example of how the approval process works in salesforce.
Creating an approval process
Before you start creating the approval process in Salesforce, you need to know the sections you need to fill in for creating the approval process. These sections are listed below logically:
- Process Definition: We need to have all the details of the approval process so that it can be specified in Salesforce. This includes detail like process name, communication template, etc.
- Initial Submission Actions: This even will be triggered and executed, when the user clicks on the “Submit for Approval”, on the object record.
- Approval Steps: This should specify the approval steps, along with the condition check and the list of the approvers.
- Final Approval Actions: This part needs to be looked upon, once the approval steps are approved.
- Final Rejection Actions: These actions will be executed, if the approval steps are rejected.
- Recall Actions: This will be triggered if any of the approval process steps have been recalled.
Creating the approval process in Salesforce:
Now we have understood what the approval process does, lets check who we can create one on salesforce.
- Login to the Salesforce, and go to Setup.
- In the quick search box, look for the “ Approval Process”.
- Once the Approval Process screen opens up, go to the section “Manage Approval Process For”. Click on the drop-down box located beside it, and select the object on which you want to create the approval process. For example, if you want to create an approval process on the object “Opportunity”, these select it from the dropdown box.
- On the bottom of the screen, you will find the section “Creation New Approval Process”. Click on that, it will provide two options, Use Jumpstart Wizard and Use Standard Setup Wizard.
- Select the option, “Use Jump Start Wizard”. It is a standard wizard that can be used for quickly creating the approval process.
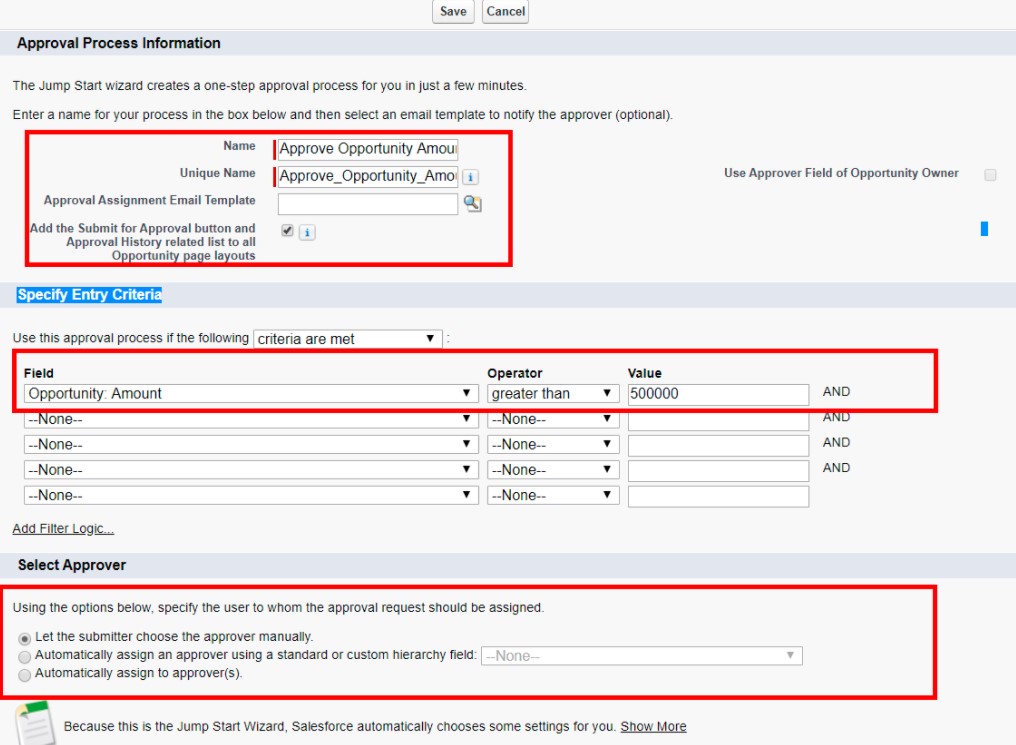
- Now configure the approval process. Provide the approval process name, approval assignment email template, Specific entry criteria (When the process will be triggered. In the select approver section, you can specify whether the submitter can choose the approver manually or approver will be assigned automatically. Click on “Save”.
The Approval process has been created. Now we have to add the field update. This can be done with the steps given below,
- Go to the “Approval Process Detail Page”.
- Go to “Final Approval Actions”, and then click on Add New – Field Update. Fill in the values, Name, Field to Update, and Specific Value.
- Click on Save.
- Go to the “Final Rejection Status”, then click on Add New – Field Update. Fill in the values, Name, Field to Update, and Specific Value.
- Click on Save.
We have successfully configured our approval process.
Email for request approval
The approval process can be sent via email. To do this, go to Setup – Process Automation Settings- check the option “Enable Approval Email Response checkbox’, and then click on Save. We can use customized for Approval or Rejection on the email. Words like Approved or Approve can be used for approval email, while words like Rejected or Reject, can be used for rejection email.
Approval Process and Workflow process
Both, the approval process and workflow process are completely automated, but both of them cater to two specific needs. The workflow process gets triggered when a record is inserted or updated. It’s a single step process, which tests the underlying condition. Moreover, the workflow trigger is not visible to its users. On the other hand, the approval process is made up of more than one step, and it mandates approval from a specific set of users at a specific level. The approval process is only meant for getting approval, it doesn’t define any workflow.