
Developing with Salesforce DX tools
Salesforce DX tools can be used for developing apps with a native experience. It is closely integrated with the Salesforce platform. The apps can be easily created and managed with the help of Salesforce DX tools. It provides a traditional as well as a native app development environment compared to some of the other third-party development platforms.
Why you should Salesforce DX tools for app development?
- Source Driven Development: Salesforce DX is structured in the form of a local directory for storing the metadata in the format of the source. Hence, the coding and testing of the application can be done simultaneously.
- Salesforce CLI: Salesforce CLI is built on the open APIs that can create powerful integrated apps on the Salesforce platform.
- Scratch Org: Easy import or emulation of an existing org into a new environment. Components are fully configurable as well as disposable.
- Reimagined Packaging: With managed packaging, customers can organize their metadata and distribute the apps while managing the lifecycle of the app.
Salesforce DX streamlines the app development cycle. It promotes a collaborative environment, that enabled automated testing in iterations, and continuous improvement based on the test result of each iteration, thus developing apps in the true Agile model. One of the important of Salesforce DX is the development of apps as package development, rather than as an org development. In the package development model, the source can be tracked, and proper version control can be implemented.
Install Salesforce CLI
Salesforce CLI is an important component of Salesforce DX. With Salesforce CLI, app development and integration are much easier and faster. Moreover, it allows the app to be tested even without deploying it in a local server or an org. Salesforce CLI can be installed on both MAC, Windows, Ubuntu, and Debian. The application file can be downloaded from the link given below.
https://developer.salesforce.com/tools/sfdxcli
For MAC it will be .pkg file, while for Windows it will be .exe file. For Linux, it will be downloaded as a tarball file, “TAR” format. In TAR format multiple files are compressed together.
The following commands need be run for installing on Linux (Ubuntu / Debian):
wget https://developer.salesforce.com/media/salesforce-cli/sfdx-linux-amd64.tar.xzmkdir sfdxtar xJf sfdx-linux-amd64.tar.xz -C sfdx --strip-components 1./sfdx/install
With the first command, the tarball file gets downloaded to the system. In the next step, a folder or a directory named “SFDX” is created. The files are then uncompressed to this folder. In the last command, the install script is executed, which installs the package. It will be installed on to the following location:
/usr/local/bin/sfdx
If you have already installed node.js, which is the open-source Java Runtime Environment (JRE), then Salesforce CLI can be installed with the “npm” command.
npm install sfdx-cli –global
To build with lightning web components, we need to ensure that the version of the Salesforce DX installed is higher than 45. The version can be checked by running the following command.
sfdx plugins –core
The output will be similar as shown below.
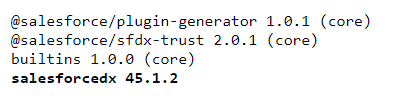
If the version is lower than 45, then run the following command to update the SalesforceDX package.
sfdx plugins:install salesforcedx@latest
In the next step, the local development server will be installed. The local development server will allow us to test the application, even before deploying to the Org. The local server can be deployed with these two commands.
sfdx plugins:install @salesforce/lwc-dev-serversfdx plugins:update
The first command will install the local development server, while the second one will check for any available updates for the local development server.
Develop apps in Scratch Orgs
Scratch Orgs are temporary environments or short term environments that can be utilized for developing a feature and can be later integrated to a much bigger solution. Thus it is reusable and disposable. The first step will be to launch the VS Code, navigate to a quick find option. Search for “SFDC: Create Project”.
Alternately, the following commands can be run from the CLI.
cd path/to/your/sfdx/projectssfdx force:project:create --projectname MyNewProjectcd MyNewProject
We have already installed ESLint and enabled Dev Hub, in our previous tutorial. If not, then it needs to be done before going to the next step. In the next step, a default search org will be created.
Go to VS Code, and look for the option “SFDX: Create a Default Scratch Org”, from the quick search option. The quick search option can be launched by using the key combination “Ctrl+P”. Alternately, the following command can be run from CLI as well.
sfdx force:org:create -s -f config/project-scratch-def.json -a "MyNewProject"
Here “MyNewProject” is the alias assigned to the scratch org and will be used for any of the Salesforce CLI commands.
The default scratch org is all set, and you can start creating new lightning web components. Now, go to VS Code, and create your first web component from the option “SFDX: Create Lightning Web Component”. Once the code for the new component has been created, save the code and push it to the default scratch org, with the option “SFDX: Push Source to Default Scratch Org”.
Salesforce DX provides a powerful platform to develops apps quickly and test them even without deploying, along with a proper version control system. However, it is fairly a new platform, and the development features are currently limited.