
Building Workflows in Salesforce
Building Workflows in Salesforce
In Salesforce, Workflow is a flow that automates certain tasks based on the given business logic. It could be described as a set of automated actions. These actions are executed, when a criterion is met. If the criteria are not met, then the records will get saved without any action being executed. Workflows can save a lot of time, and it eliminates the requirement of human intervention It also makes the operations error-free since everything will be defined in the logic.
Workflow rules
Before we dig deep into the workflows, let us first understand a bit about the workflow rules. Check the diagram shown below.
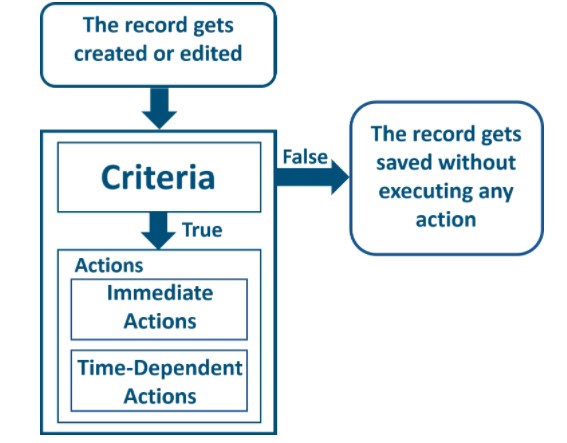
If we evaluate the above diagram, we can find two prime components. These are:
- Criteria: Criteria here refers to the conditions which will evaluate the incoming record. It is just like an if-else statement. For example, if the record is a priority 1 incident ticket, a notification will be sent to enlisted users, else the record will be saved. This is the same way, where we use if-else logic to evaluate a condition in a code.
- Actions: Post evaluation, if the conditions are met, then it will be followed with the action. Again, in terms of programming language, we will have if-else-then. Going back to the last example, the action is sending a notification to the listed users, if the condition is met.
In Salesforce, we can have two types of action. These two types are:
- Immediate Actions: In this case, the action will be executed immediately as soon as the criteria are met. The trigger could be the creation of a record or editing a particular record.
- Time-Dependent actions: In time-dependent action, the action will get executed only after the specified time. For example, a case has been created, and by default the case will be autoclosed after 10 days, to prevent case aging, and enhance customer satisfaction.
What happens, when a record is created or edited? The condition of the workflow that is already active on a particular object will get evaluated. The output will be Boolean, either it will return true or false. It will return true if the action associated with the condition is executed, else it will return false if the record is saved without any further action. This shows that workflow rules can automate the actions on the records, based on the condition that has been set. A record is an information, and definitely, it gets processed further, once it is created or edited. Salesforce makes it easier by automating this processing based on business logic.
Different types of evaluation criteria
There are three types of evaluation criteria available in Salesforce. These are described below.
- Created: This is when the record is created, and the given condition matches with the record, the follow up action will be executed.
- Created and edited it: This is when the record is created or edited, and the given condition matches with the record, the follow up action will be executed.
- Create and edited to meet the criteria: In this case, the record is created and then the record is edited further, to meet the set condition.
There is no limitation on the number of actions that can be executed at a time. However, action types are limited. Following actions can be committed, if the condition is met.
- Assign a task to another user
- Updating a field
- Sending notification to other users or external entities (Email notification or Outbound Message).
Configuring the Workflow in Salesforce
Now, we know what is a workflow in Salesforce, let's check how we can configure a Workflow rule criteria in Salesforce.
- Login to your Salesforce account, and go to the homepage. By default, the homepage will be displayed post login.
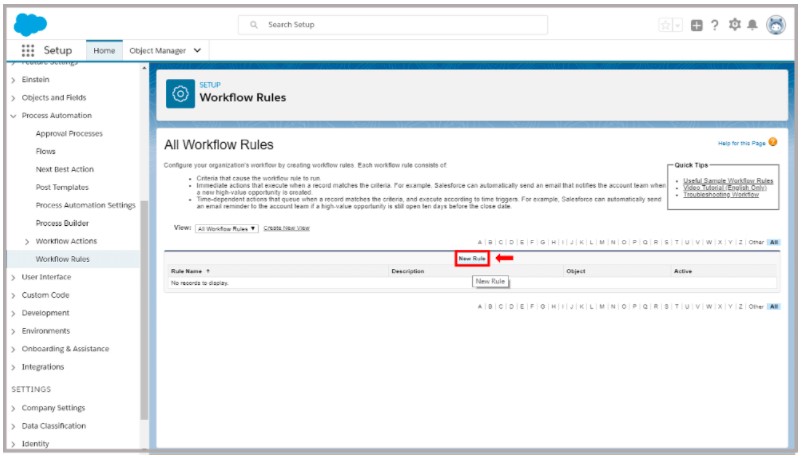
- Now on the left sidebar, you will find the section “Process Automation”. In Process Automation, you will find the option “Workflow Rules”. Click on that.
- On the next screen, click on “New Rule”.
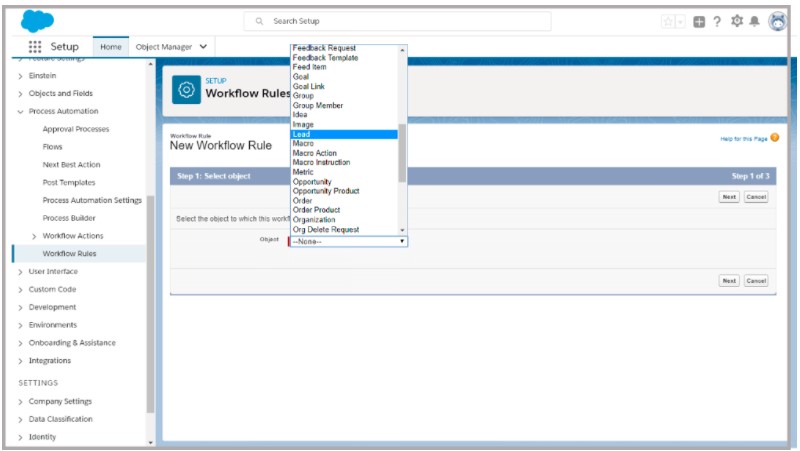
4. This will open up the “New Workflow Rule” screen. On this screen select the object, with which the rule will be associated. For this tutorial, we have selected “Lead”.
5. In the next step, you will get the option to configure “Workflow Rule”. Here you need to set the following fields.
-
Edit Rule: Assign the rule name
- Evaluation Criteria: Put the evaluation criteria (Logical operators)
- Rule Criteria: Here, select “Criteria Met”, and define the filed for condition check.
6. Click on “Save”, hit “Next”.
7. In the next step add the workflow action if the criteria are met. For example, if the condition is true, email should be triggered. We can select “ New Email Alert”. Once set, click on “Done”.
8. Define the email alert, such as the recipients, description, and email template. Once these details are provided, Save the options, and click on “Done” on the workflow rule section.
9. The workflow rule has been created, but you cannot use it because it is not active. Click on the “Activate” option to activate this rule.
The workflow rule is set now, and it needs to be tested. Try to create a new record for the lead object, and check if the condition is met or not. Check if the condition is met, it is triggering the email or not. If the email is not triggered, then the condition is met.