
Role Hierarchy in Salesforce
A role hierarchy plays an important part in determining the user access level. It is used with the sharing settings to define the access level. As per the hierarchy level, any users who are higher in the hierarchy can access data of all the users who are below in the hierarchy. There will be users in the organization, who will like to watch almost every data and a lot of data. This includes CEOs, departmental heads, directors, etc. These users are at the top of the hierarchy. However, role hierarchies might not be set in accordance with the organization chart. In Salesforce, the level of the hierarchy only defines the level of access to the data, that is required by users or user groups.
Based on the sharing settings, different roles can manage the level of the visibility of the Salesforce data. Users who are higher in the hierarchy with any role level, can view the data, edit the data, and report any data, that is owned by a user who is lower in the hierarchy. This means users can access the data of users who are under their hierarchy level. This process can be overruled or nullified by using a sharing model. If the “Grant Access Using Hierarchies” is disabled in the OWD list, then the objects record can be accessed only by the record owner, and any other users that have been granted access by the OWD. So, in this case, the hierarchical access will not work.
The sharing access in the hierarchies can be controlled by the “Sharing Settings”. Sharing settings can be accessed from the quick find box, from Setup. In the OWD section, click on edit, and then deselect the option “ Grant access using hierarchies”. This will automatically prevent access to data of lower-level users by higher-level users.
Define a role hierarchy in Salesforce
This could be an easy activity if you exactly know how the hierarchy will look like. Probably, this needs a lot of planning and discussion, before implementation. In case if you are confused, then just try to prototype the org chart. Then compile the list of the designations and roles. This could be a time-consuming task but required before we define the role hierarchy. Once you have decided on the hierarchy, you can start implementing the same on salesforce in simple steps.
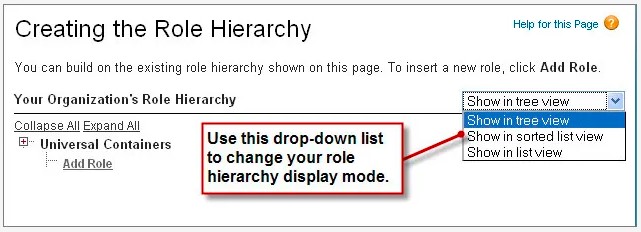
- Go to Setup, and from the quick find box, look for “Roles”. Once the Roles page opens up, click on the option “Set Up Roles”. This will be located at the bottom of the page. The view of the page will be organized in the tree view, which is the default view. There will be an option to change the view to list view as well but stick to the tree view, as it clearly defines the hierarchy level of the users. Initially, the tree will only have one placeholder, which will display the name of the company name or org name.
- You will find the option “Add Role”, just under the company name. Click on that. If the role already exists, then you can edit it.
- In the Label, enter role name. For example, if it is Chairman, then put Chairman in the Label box. Once the label name is defined, the Role Name will be auto-populated with the Label Name. So it will automatically show as “Chairman”.
- In the next step specify the option “ This Role Reports To”. Click on the lookup icon in this option and select your org from the list. This will indicate the Chairman is at top of the org, and he doesn’t report to anyone.
- In the next step, specify the option “Role Name as displayed on reports”. We can mention “Chairman”. Whatever we fill here, will be displayed in the reports.
- Leave the other options with defaults, and click on “Save”.
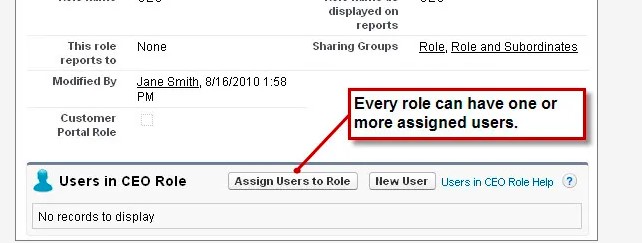
- Once you click on Save, the role Chairman will be created. You can assign users to the Chairman, by going to the Chairman detail page, and clicking on “Assign users to Role”.
- Select the users, and click on “Add”, and move to the Chairman role.
With this activity, we have successfully created a role, and assigned users to it. This activity can be repeated to add multiple roles in the hierarchy diagram.